This is part 1 of an expansive series about using websockets in Laravel and Laravel Echo package. Click here to see the Websockets Series Overview.
The focus of this part is to get our project setup so we start really learning how to use Websockets. I have already built a sample Laravel application for you which is a simple blog platform. It enables you to very simply create new blog posts and for users to view the posts.
The goal of this entire tutorial series is to add the commenting features of our blog and allow comments to be added with ajax, and for any other users who are currently reading a blog post when a new comment is added, to see the new comment live updated on the page without a page refresh. This comment live updating feature is what will require websockets and how we will learn to use them with Laravel Echo.
So to start, I have created a video and a checklist (below) that you can use to get up and started with this tutorial series. We will be cloning our sample project off of Github and setting it up on our local system, then seed the database with some dummy data to allow us to play around with things.
The second half of this video and checklist is to set up things necessary to work with websockets and Laravel Echo. If you are working with an existing project than you will want to start with the second half of this video so that you can add the packages and prerequisites necessary to make sure that websockets work correctly in your application.
Setup our Demo Project
This will get your tutorial project files setup on your computer. If you are working on your own personal project than skip this section and move to the “Setup Echo Project” section to see the steps that are necessary for all projects.
Demo Project on Github: https://github.com/DevMarketer/Laravel_Echo_Tutorial
I went ahead and created a demo project that will help you get started. It is a basic blog system that allows you to create, edit and delete blog posts, with some basic authentication scaffolding setup. In the next video we will add the feature to create comments to our blog posts and then we will take it a step further to make it realtime.
Go ahead and get started by cloning the repository (and moving to the start tag) or download it here right at the start tag: https://github.com/DevMarketer/Laravel_Echo_Tutorial/releases/tag/start
This start tag ensures that you have the beginning of the project and can follow along. If you download the end of the project state, then all the code in this tutorial will already have been written for you. So make sure to download the start tag on the repo.
Once you download the repo, do the standard stuff it takes to get started with a Laravel project such as running composer, running NPM, creating a copy of your .env file, generate an encryption key, setup the database, and then migrate the database. If you are having a hard time getting the project working, I have written a tutorial on setting up a Laravel Project from GitHub clone that you can follow which goes into detail on each of these steps. Once you finish that tutorial, continue right where you left off on this page.
Once you have setup the demo application, the final step before we start adding the websockets components (in the next few steps) is to seed the database.
Seed the Database
After the migrations are complete and you have the database structure required, then you can seed the database (which means add dummy data to it). I have already created the seeder file, so you just need to run it.
php artisan db:seed
The seeder will create 25 randomly generated users and 100 randomly generated blog posts in your database. If you want to log in as a user, grab an email address from the database and use “secret” as the password to log in as that user.
Test Your Demo Blog App
This completes the setup for our demo project. You can now test it and you should have a nice little blog setup. But you will notice there is no commenting functionality. That is what we will be adding in the next video and we will incorporate that with websockets and Laravel echo to make it feel truly dynamic.
Create/Setup a Pusher Account:
To host our socket server we will be using a PAAS called Pusher. This is a great platform that integrates beautifully with Laravel and has a generous free tier. To follow along in the tutorial please take a moment to create a pusher account (and app) if you haven’t already.
Don’t worry because if you decide to use another socket server solution later, it will be easy to do so. Because we are using Laravel Echo, we can simply change the driver and api credentials for the new socket server and everything should work instantly without any code changes. That is because Laravel Echo is agnostic to the service you use (the same code works for many different socket services, we just change the driver and authentication credentials). The code we use in future videos to react to changes on the socket server is the same regardless of which service we use. So I recommend Pusher to learn with and then trying other socket server solutions as you grow in your confidence with Web sockets.
1. Log Into Pusher.com
Open a browser and log in to Pusher.com. If you struggle with this step than this tutorial is not for you.
2. Create new app
This must have a unique name across all of Pusher. Also be sure to choose a location that is centrally located to where your users are expected to log in from. This is the server where you app will be located.
3. Open Up Your App to get App Keys
You should click the tab that says “App Keys” and produce some app keys for this new app. These are the credentials we will need to allow our Laravel App to communicate with the Pusher servers.
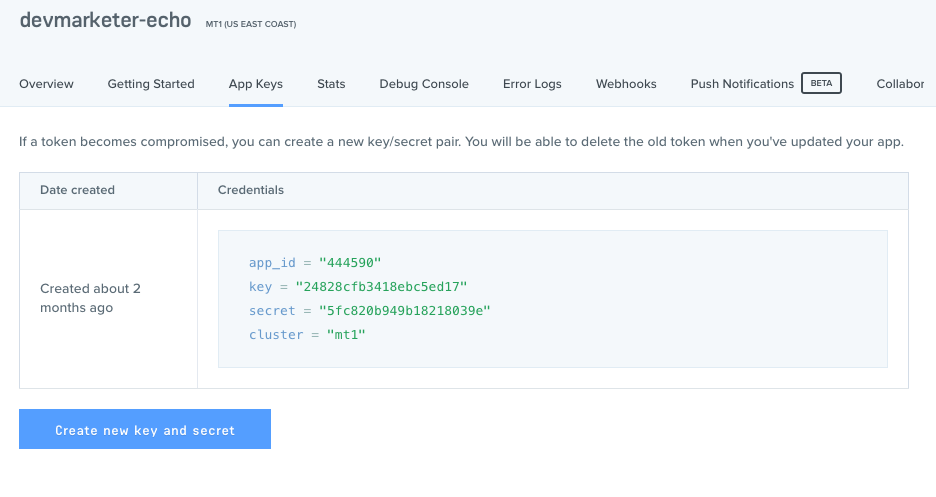
Keep this page open while you continue your setup. We will need to reference it a few more times as we push forward.
Now it is time to configure everything to prepare our Laravel project for websockets. If you were working on your own project and wanted to add websockets and Laravel Echo to it, then the next section is where you want to begin to add the necessary packages and settings to make your own app work with Websockets.
Configure a Project to Work with Laravel Echo
This is the part of the tutorial you will want to follow everytime you need to add Laravel Echo to a project you are working on. These are the steps that need to be taken to prepare any Laravel project for websockets and Laravel Echo.
1. Install Composer Dependencies
If you are using Pusher as a socket server, then we want to add the pusher php library to our project via composer. This will allow Laravel to broadcast our events server-side to the pusher api whenever an event is triggered.
composer require pusher/pusher-php-server
2. Add NPM Dependencies
Now its time to add NPM dependencies. This is where we actually finally install Laravel Echo, the purpose of this whole tutorial. Many people are confused to learn that Laravel Echo is actually a javascript library and not a PHP library and so it is installed via NPM. Laravel Echo will run client-side in our javascript and that is where we configure it as well in a few steps. The server-side portion of broadcasting actually happens natively in Laravel without any additional packages (other than the pusher api library).
npm install --save laravel-echo
or
yarn add laravel-echo
Also, if you are using Pusher as your socket server then again we want to install the pusher javascript library for client-side Pusher API usage too. Skip this step if you are not using Pusher.
npm install --save pusher-js
or
yarn add pusher-js
3. Activate the broadcasting Service Provider
By default, new Laravel projects actually comment out the inclusion of the broadcast service provider to prevent errors for users who do not intend to use broadcasting. However, it is setup for us to activate by simply uncommenting out the line as it is already prepared for us in our app configuration file.
In config/app.php uncomment the App\Providers\BroadcastServiceProvider::class, line near the bottom of the file.
4. Setup Broadcasting connection settings in Laravel
Just like how we had to configure settings for our database, we need to do the same to allow Laravel to connect to our pusher or other socket server. These connection settings are set in the config/broadcasting.php file, most of these settings are actually placed in the .env file, just like the database.
Create or edit connection settings in the config/broadcasting.php file.
For Pusher we use:
'connections' => [
    'pusher' => [
        'driver' => 'pusher',
        'key' => env('PUSHER_APP_KEY'),
        'secret' => env('PUSHER_APP_SECRET'),
        'app_id' => env('PUSHER_APP_ID'),
        'options' => [
            'cluster' => env('PUSHER_APP_CLUSTER'),
            'encrypted' => true
        ],
    ],
]
Then just make sure that in your .env file you add in the following keys:
PUSHER_APP_KEY=
PUSHER_APP_SECRET=
PUSHER_APP_ID=
PUSHER_APP_CLUSTER=
Also now add the values for each of these properties. So that it shows PUSHER_APP_KEY=Hd32DHn34JHJS32JSHD. Remember to fill out all 4 of these properties with the ones matching your application that we set up on the Pusher website in the previous step.
All of this information can be attained on the pusher website under the “App Keys” tab for your pusher app. It will be unique to your application. Copying the keys used in the video will not work!
5. Set the broadcast connection
Now that we have configured a broadcast connection, lets tell Laravel to actually use it. To do this, change the BROADCAST_DRIVER in your .env file to match name of the connection you just created or edited in the previous step. (In our tutorial we are using the connection named “pusher” so the env file should show BROADCAST_DRIVER=pusher).
6. Set Queue Driver
By default all broadcasting in Laravel is queued so you will need to set up some queuing to get this to work. This also means to remember to set up QUEUE_DRIVER in your .env file while you are there. The “sync” driver will work for this tutorial but is not suggested for production applications. Consider using redis or beanstalkd instead after pushing this project to any real-world production project.
7. Set CSRF Meta Tag on Each Page
Laravel Echo requires a CSRF token in the meta tags of your pages. It uses this as part of its middleware process which ensures CSRF protection as one of its filters. So it will need access to the CSRF token just like a normal form in Laravel requires. So add one to the top of every page (preferably using a templating system so you only have to do it once).
Near the other meta tags (Right above the title tag usually) add:
<meta name="csrf-field" value="{{ csrf_token() }}>
8. Setup your app.js file to contain Laravel Echo
Now that we have installed Laravel Echo into our project via NPM, its time to actually implement this package into our project by importing it into our app.js file so its available throughout all of our application views.
In resources/assets/js/bootstrap.js uncomment out the bottom part of the file from import Echo from ‘laravel-echo' through the bottom of the document.
NOTE: The window.Pusher line is necessary to globally include the pusher javascript library and thus is necessary for people using Pusher. If you are using socket.io or some other library you can delete this line and add a similar one to globally include some other library that might be necessary.
The final block which starts with window.Echo = needs your publishable pusher key and cluster information.
The final code will look like this:
window.Echo = new Echo({
    broadcaster: 'pusher',
    key: 'your-publishable-key-here',
    cluster: 'your-three-char-cluster-code',
    encrypted: true
});
9. Clean up the app.js file
I recommend looking over the app.js file one more time to make sure it looks good. In the tutorial I am cleaning up the Vue stuff so that we do not have a globally instantiated Vue object and I comment out the Vue.component line. This is because we will not use it in the tutorial, but it might be something you want to keep in for other projects and thats ok.
10. Compile your App.js with the Changes
Now that we have done everything needed in the bootstrap.js and app.js to get ready for websockets, its time to compile the changes into the public public/js/app.js file.
Compile the file with the Laravel Mix command:
npm run dev
This will compile your app.js file into the public directory so the changes take effect in our application. Now any view that uses this file, will have client-side access to Laravel Echo.
In my demo, we have already included your app.js file into the master view template. But if you are adding this functionality to your own application, then remember to make sure the app.js file is included into your views, so that Laravel Echo is available client side to your views.
Conclusion
You did it! That is the setup necessary to get a project configured with websockets. This is the stuff you will want to do before you start working with websockets and Laravel Echo in any future projects that you have.
The hardest part is step 1. If you can pass it, than you can do anything.
nice