If you are a bleeding edge developer, preferring the newest fanciest version of Ubuntu running on your AWS EC2 instances, you might have found yourself frustrated that the Ubuntu option available in the Amazon EC2 instance creation wizard is only for Ubuntu 16.04.
No need to worry, its ridiculously simple to get an Amazon AWS EC2 instance running Ubuntu 18.04 with this quick trick.
Get Amazon AWS EC2 Running Ubuntu 18.04
To get started, obviously make sure that you have an Amazon AWS account. You will want to be logged into the account either through the CLI (Command Line Interface) or the Console.
1. Open a New Tab Now and Log In
To make things run smoothly, briefly pause reading this, open a new tab, and log in through your preferred method for creating an instance.
While you are over there, take note of the region that you want to host your instance in. You should know the region code like us-east-2 or eu-west-1. Note this if you don’t already know it, because it will be important in the next step.
Once you have logged into your AWS instance, then come back and continue to step 2.
2. Search For an Ubuntu 18.04 Server from Canonical
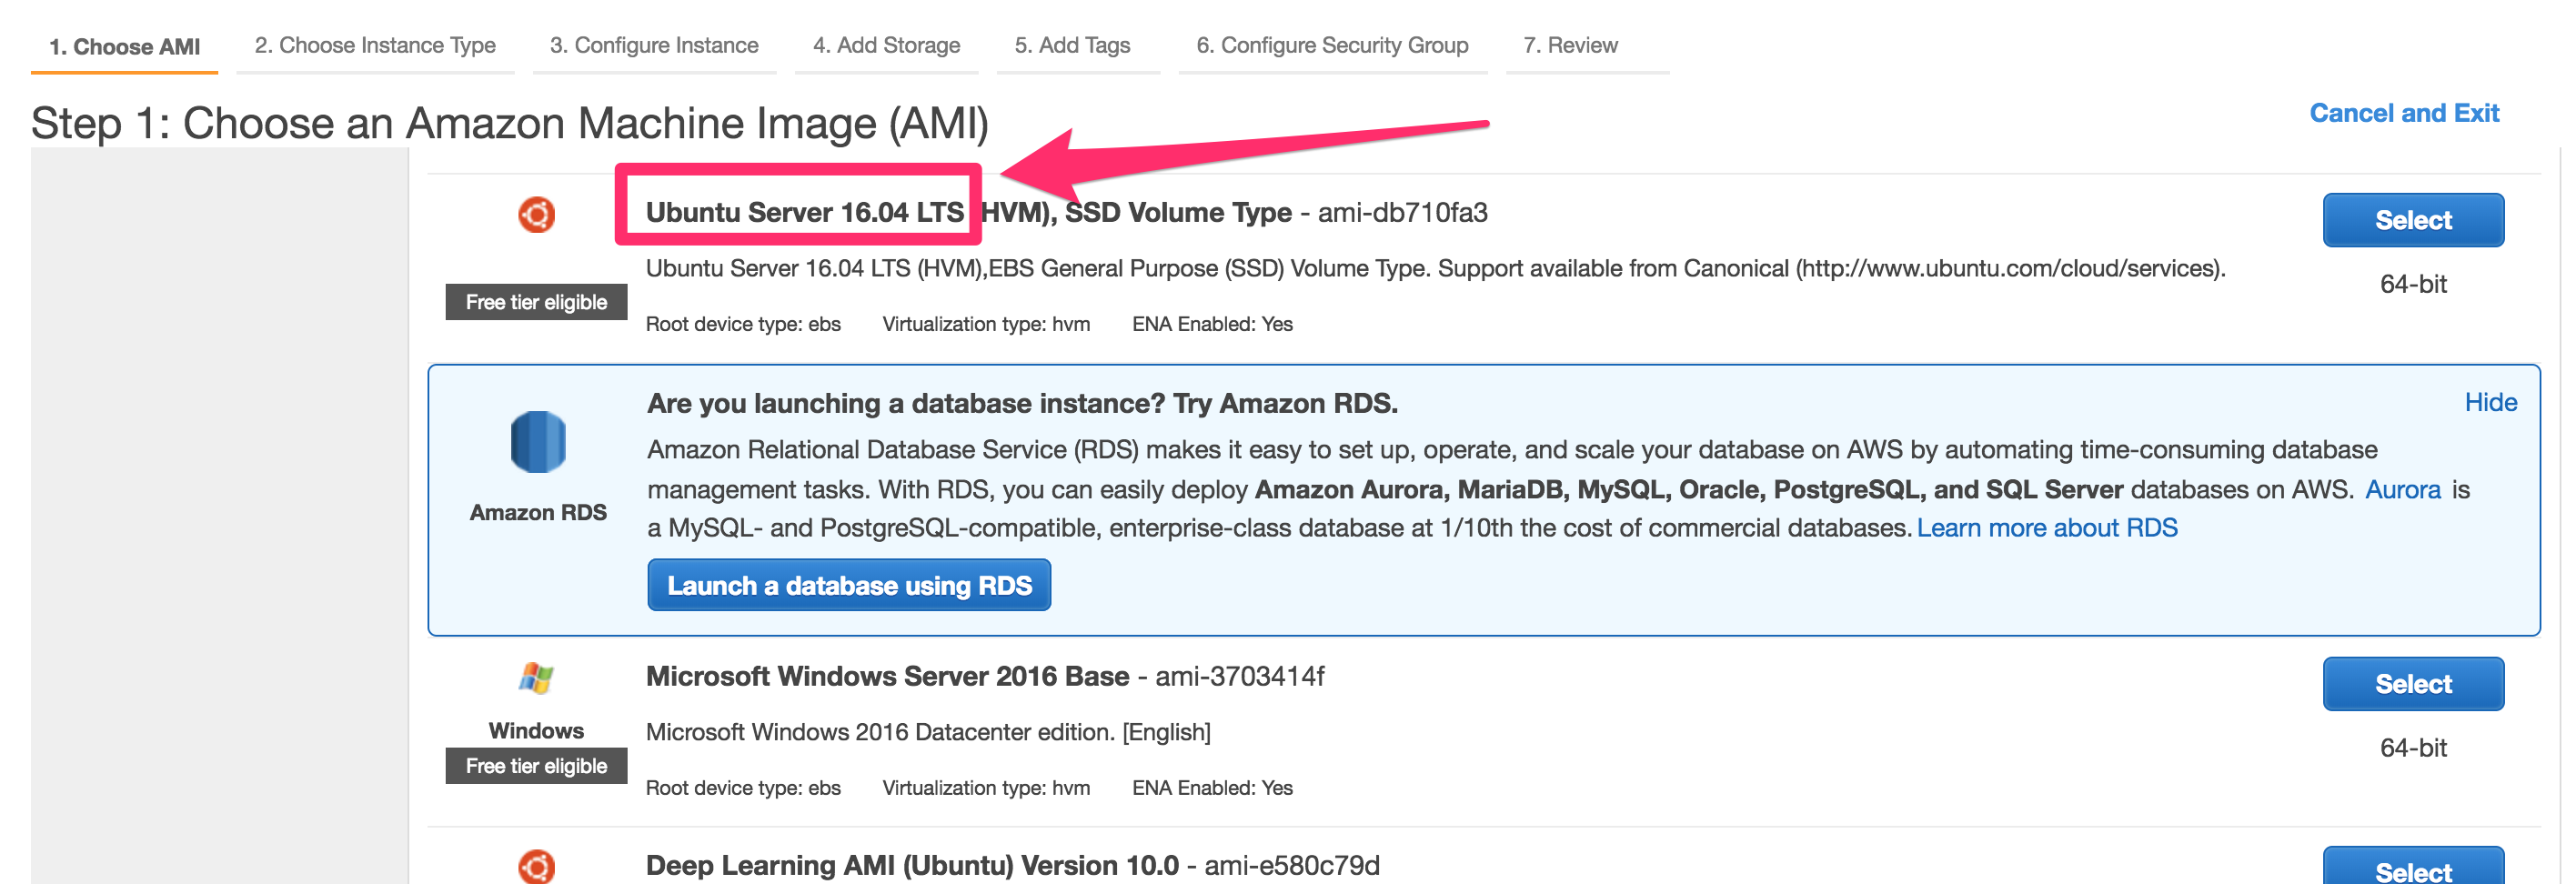
So you aren’t going to be able to find this directly through Amazon AWS. The EC2 panel only offers Ubuntu 16.04 because the majority of their free capacity is running this version of Ubuntu.
Amazon does make Ubuntu 18.04 available because there is a demand for it. But, only the pros know this trick!
Canonical, the maintainers of Ubuntu, list a very powerful live table on their website that will help you find a specific server on AWS that you is running whatever version of Ubuntu you are looking for.
So this same trick actually works if you are searching down legacy versions of Ubuntu too!
Use the Amazon EC2 AMI Locator to search for your perfect Ubuntu installation.
3. Find the Perfect Ubuntu Setup by Filtering Version Numbers
When searching through the Amazon EC2 AMI Locator page, there are a few things you need to keep an eye on to find your perfect Ubuntu setup.
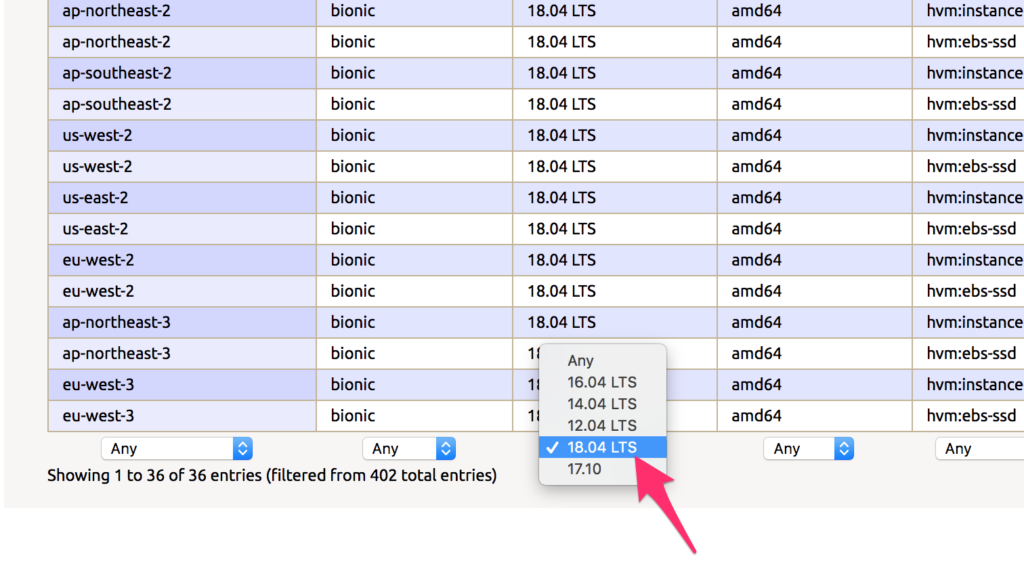
First start by limiting the results to only Ubuntu 18.04 LTS, or whatever version you are looking for. You can do this by scrolling to the bottom of the page. Under the 3rd column (from the left) there is a dropdown with various Ubuntu versions listed. Select your preferred version and the list will update to only show AWS EC2 servers with that version of Ubuntu installed.
4. Find Your AWS Region
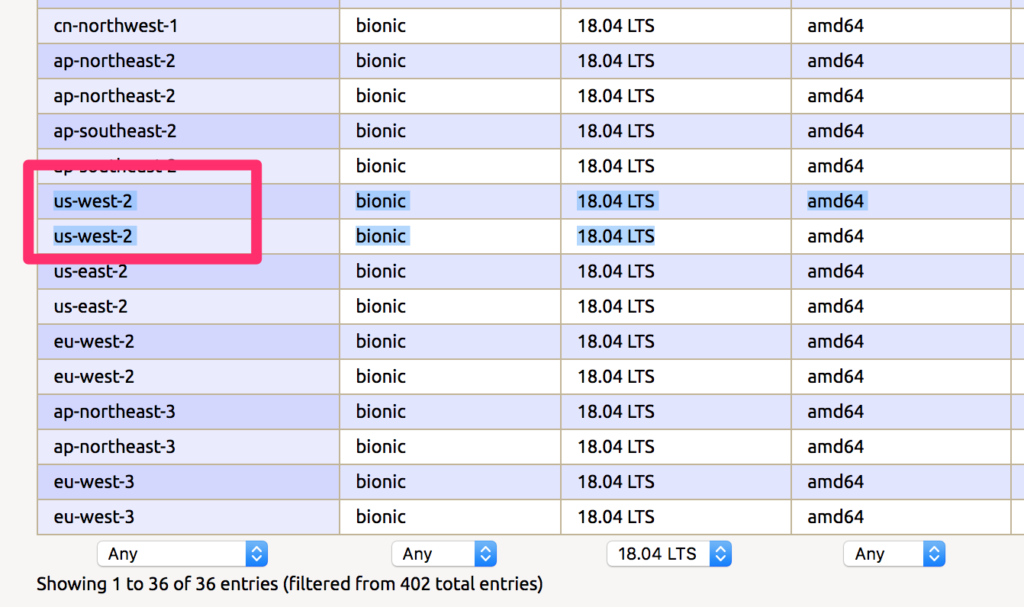
Next you are going to find a server in your region. The far left column will note various AWS regions that this EC2 server is running in. This is why I was particular with you noting the region you wanted in step 1.
For example the Oregon region is us-west-2 so you will look through the list of servers (filtered to only show your Ubuntu version), and find the line that represents the region you want your virtual server in.
If you can not find your region, try to list more servers by expanding the entries limit right above the list to show more than 100 and find your region.
Keep an eye on this row, highlight it with your mouse so you can find it later.
4. Determine Your Instance Store
Lastly, you might find more than one server that contains your Ubuntu version and your AWS region. Usually the difference between these two options can be found in the instance store column. This is the 5th column (starting from the left).
You will usually see two options
- hvm:instance-store
- hvm:ebs-ssd
This isn’t to say that AWS won’t add more in the future, but these are the primary ones.
Two pieces of information are available. Before the colon it says hvm which is the type of virtual machine it is running. In generally you don’t need to worry about. That I have seen (as of mid-2018), Amazon uses HVM for all of their Ubuntu servers. So they will probably all be HVM, don’t worry about this.
The next piece of information is either instance-store or ebs-ssd. This is slightly more important to understand.
What is EBS-SSD?
EBS stands for Elastic Block Store, which is a sub-service offered by AWS. This allows you to have a persistent, universally available block storage across multiple EC2 instances, or dedicated to a specific instance.
…This is what most people want
If you are looking for persistent data (objects stored on your server that exist between reboots) than you will want to find one that offers this hvm:ebs-ssd. This is what most people are probably looking for. Most of the smaller tiers of servers require EBS storage, so if you are looking at spending <$100 a month on a server (or stay in the free tier) than you will also want to select this option.
What is Instance-Store?
In contrast hvm:instance-store is a form of directly-attached storage. This is storage that is not available through reboots, so only use it for temporary storage applications.
The instance store is ideal for temporary storage, because the data stored in instance store volumes is not persistent through instance stops, terminations, or hardware failures.
I wanted to note this so people don’t get unexpected experiences with their EC2 instance after running it, where they lose a locally installed database with each reboot. That would not be good (although you should probably be using Amazon RDS or DynamoDB anyway)!
5. Boot Up Your EC2 Instance With The AMI-ID
Ok, so now you have found the row in the table that contains your perfect AWS EC2 server. Based on the region, the Ubuntu version, and the Instance Type (storage) you can now follow that row over and find the second to last column (2nd column from right side) labeled AMI-ID.
How to Boot EC2 Instance from the CLI
So now that you have your AMI-ID, you will use this to create a new EC2 instance from the command line.
In the command line you can use this template, filling in necessary information like the AMI-ID that we just located, and your AWS Credentials.
ec2-run-instances ami-xxxxx -O AWS_ACCESS_KEY -W AWS_SECRET_KEYRun the command by clicking enter, and finish creating your EC2 instance with Ubuntu 18.04! How awesome was that?
How to Boot EC2 Instance from the AWS Online Console (GUI)
If you don’t feel comfortable using the command line, you can also create it using the online visual wizard.
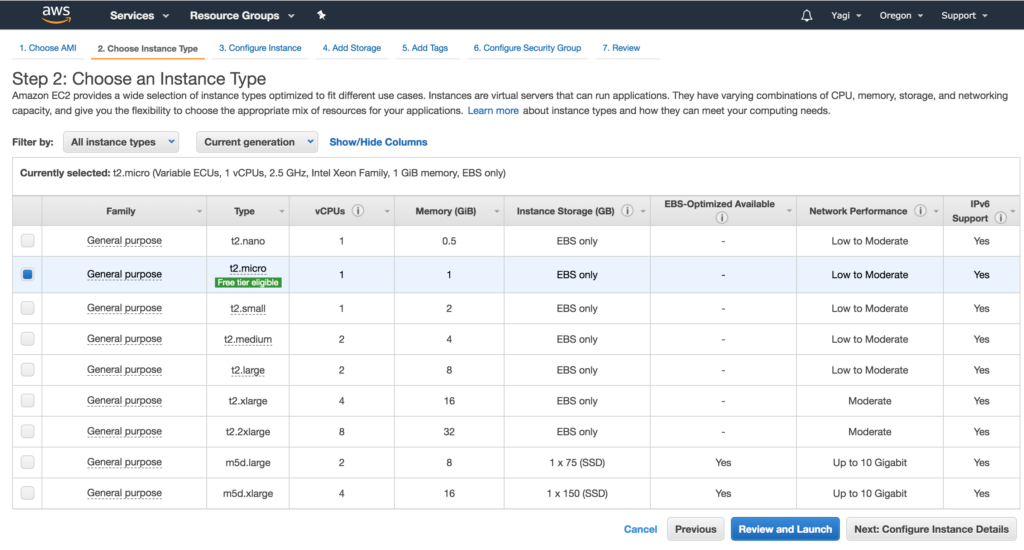
To do this, you will need to go back to the table row that you found earlier on the Amazon EC2 AMI Locator page and click the AMI-ID that you found in second to last column. This link will take you directly to the AWS wizard (which is why you wanted to be logged in, in step 1) with the AMI pre-selected.
Now you just finish creating the server using the graphical/visual interface.
Bottom Line:
Overall, this was a pretty straightforward process once you understood what you were looking for.
Link: Amazon EC2 AMI Locator
Follow the link to the Amazon EC2 AMI Locator hosted by Canonical (the maintainers of Ubuntu) to find the perfect EC2 server for you. This list lets you sort and filter servers according to your exact specification.
Search for a server using this criteria (in this order):
- Filter by Version: to only show the version you want (in our case Ubuntu 18.04)
- Find your Region: this is shown in the far-left column labeled “zone”. Match this to the AWS region you want your server to be in
- Find a preferred instance-type: This will usually be either ebs-ssd or instance-store. EBS-SSD is the best for most people, so select that if you are not sure
Were you able to find the server you were looking for and boot up an Ubuntu 18.04 instance? If so, be sure to tell us how it went in the comments.
So I was looking for ways to prevent duplicate clicks. And I tried it in your site. You have some javascript here in https://devmarketer.io/wp-content/plugins/thirstyaffiliates/js/app/ta.js?ver=3.3.5
. Couldn’t quite get the idea there, It’s a big giant endless messy javascript code. Thank god you had some commen’t lines.
Hey JACurtis, I sent you email on hello and alex email addresses, please respond. thanks
Thanks for this ridiculously simple hint/guide. I’ve used AWS for a long time but this is my first shot at creating a live instance. So far, so good. I’ve been using 18.04 on my local development server, so I need a matching version on deployment. Well done, thanks.