So you worked hard to build your Laravel 5.3 (or any version 5) application and now its time to deploy to the internet so you can share your hard work with everyone. In this tutorial we will learn to set up Laravel onto a virtual private server (VPS) using what is called a LEMP stack. LEMP is an acronym that stands for:
- Linux
- Engine-X (Nginx)
- MySQL
- PHP
The LEMP acronym represents the stack of technologies we will use to deliver our application. You may also be familiar with LAMP stack which is basically the same thing, but substitutes the Apache server for the Nginx server (pronounced Engine-X which gives LEMP the “E”).
Why LEMP and not LAMP?
Well honestly it is up to you. The reason I chose to use LEMP with Laravel is that it seems to be the preferred stack among the Laravel community. Keep in mind however, that Laravel runs just perfectly fine on an Apache server, if you feel more comfortable with that. So for this tutorial we will use Nginx over Apache, but I may follow up with a LAMP stack tutorial if there is adequate interest from my fellow DevMarketers out there. Let me know in comments.
One other thing I should mention is that when running smaller server instances like we are (with 512mb RAM or maybe 1Gb) it has been shown that Nginx performs better with more limited resources. Of course Apache is the most popular server on the internet by far, so I have no hate towards either one.
Where Should I Host?
You can host it anywhere that you wish. Keep in mind that this tutorial will cover setting up your server through SSH into your VPS instance. This means that it really doesn’t matter who you host through, once you have your IP address and you log into the server via SSH, the tutorial will work the same regardless of your host. So feel free to choose whoever you prefer for hosting your server, you can still follow this tutorial exactly the same.
Some hosts that I recommend would be Vultr, DigitalOcean, and Linode. I have used all three in production and they work great. For this tutorial I will be using Vultr and if you would like to sign up through DevMarketer you will get $20 to get started, absolutely free.
Step 1: Set Up Your VPS
This is the only step that will vary depending on which host you choose. I will be using Vultr, but the interface is almost 100% identical for Digital Ocean, should you decide to use them. Linode has a more basic interface, but will ask almost identical questions.
A. New Server (or Droplet)

To get started we need to boot up our wizard for creating a new server. You are looking for the button for “New Server”. If you are on DigitalOcean, they call servers “Droplets”, so you select “New Droplet”.
B. Configure Server Location
Now it is time to choose the physical location that your new server will be located. Each service has their own datacenter locations, but in general it is best to choose a location closest to where most of your users will be. So even if you are located in India, but most of your users are from the UK, then you should choose a London server. This makes your server fast for your users.
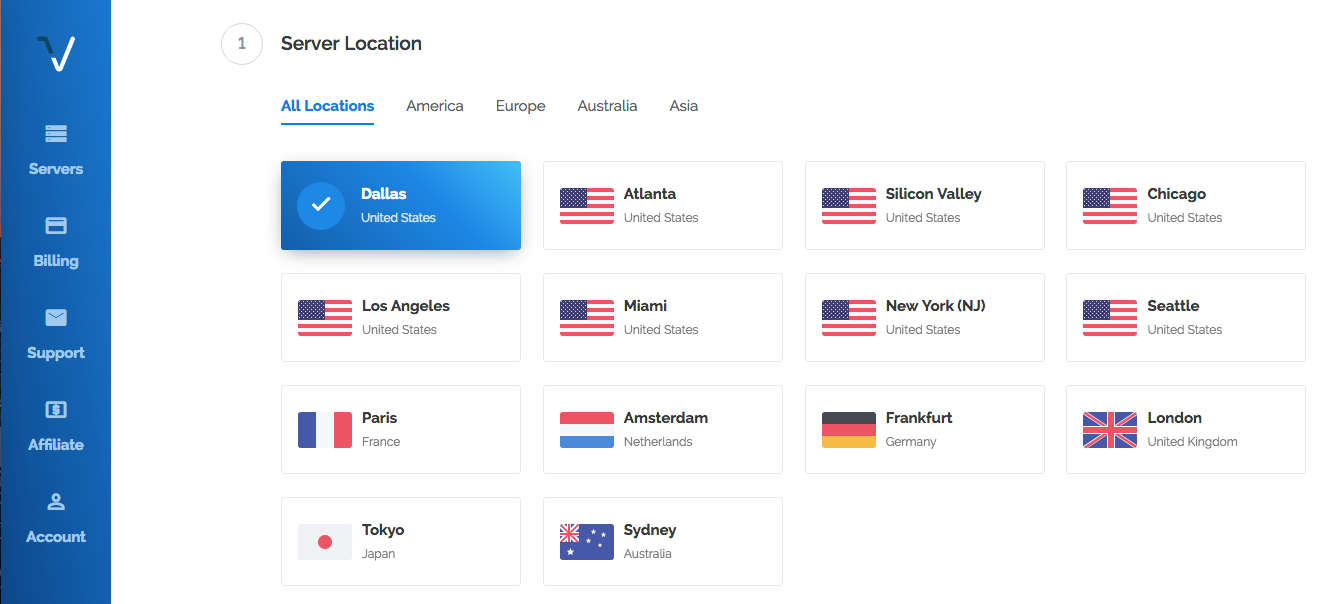
Select a location that you prefer to host it at that location. On some services there will be multiple dataservers at a single location. You basically just choose a number at random, it won’t make much difference, unless you have some sort of insider information at your disposal.
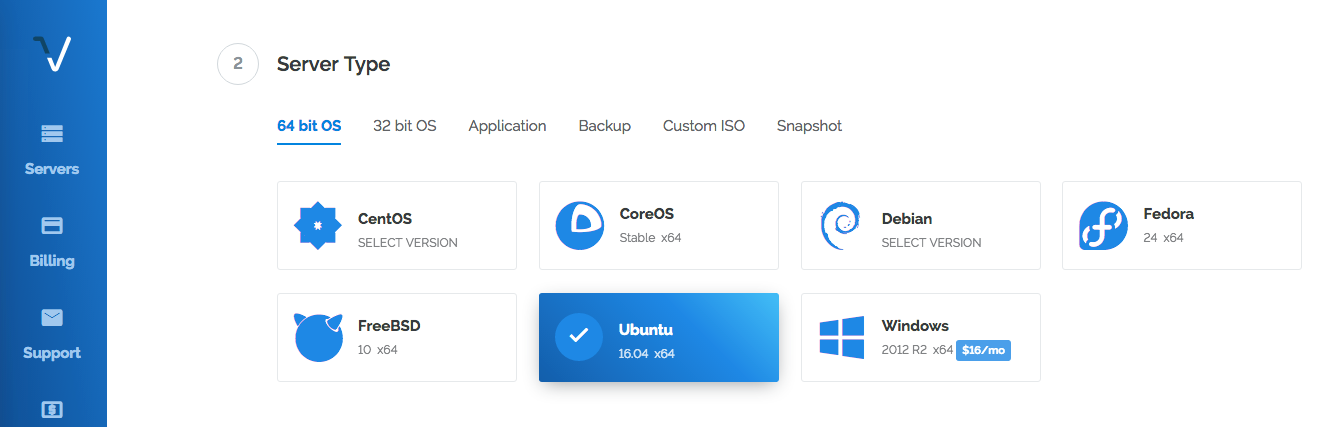
C. Select Linux Distro
The next step requires you to select which version of Linux you would like to use (this will configure the “L” in our LEMP stack. For this tutorial we will be using Ubuntu 16.04 x64 as our distro. Of course any of these will work if you have experience with them, but I will be demonstrating Ubuntu 16 in this tutorial.
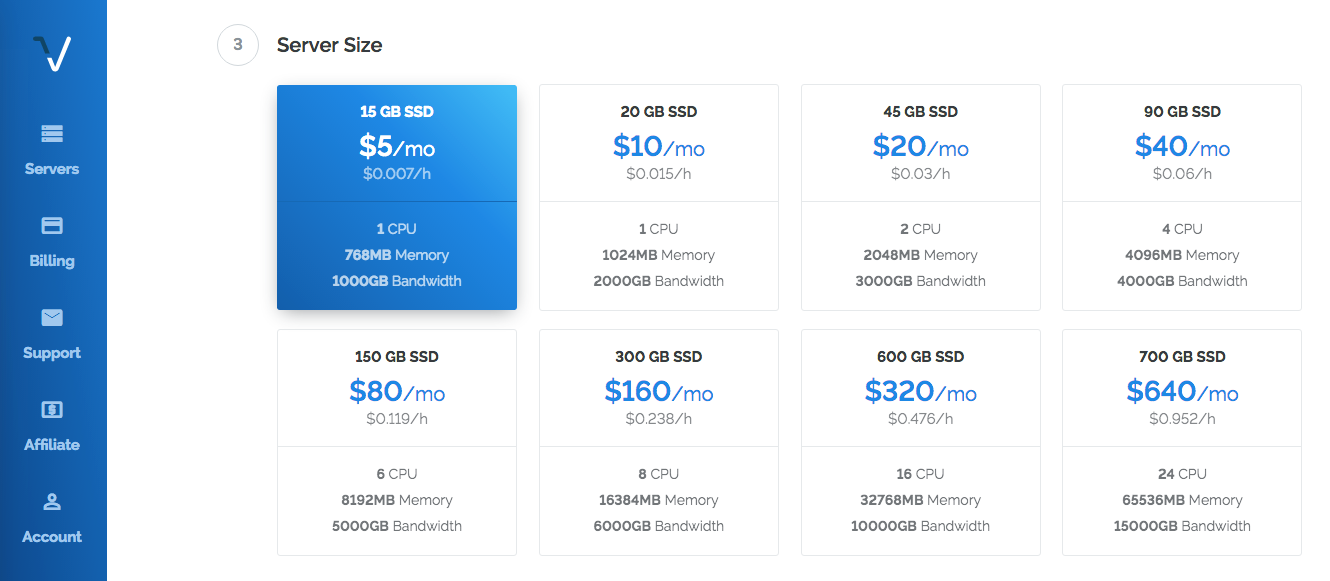
D. Server Size
This is the setting that will change the most depending on your application and what service you are using. Most Laravel applications are suggested to have a minimum of 1Gb Ram which is usually the $10 a month plan for most services. However small Laravel apps work just fine on 512Mb or 768Mb servers too. Obviously you also want to take into account your traffic which will have the largest factor on which server size you select.
As you may notice, you get a slightly better deal by going with Vultr, as you get a little bit extra RAM for your $5/mo plan.
E. Additional Settings
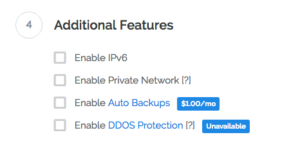
These additional settings aren’t super important for now. Just choose what you think you will need. These settings vary a little between hosts but most ask if you want to use IPv6 (recommended), auto backups and more. Vultr has a cool feature to protect against DDOS attacks if you are in certain datacenters. I suspect this will expand in the future to all of their datacenters.
In Vultr you may also set up a Startup Script. You can leave this blank for now. We do not need it.
D. SSH Keys
It is HIGHLY RECOMMENDED that you set up SSH keys here. You will need to have SSH keys set up for your account and once you do, then you can simple check the SSH keys on your account to allow them root access to your application. For DigitalOcean when you select an SSH key then they actually do not create a username and password for you (you can always add it later through SSH). On Vultr they still email you username and password after you boot up the server, but its still a good idea to set up the SSH key as it is far more secure and more convenient.
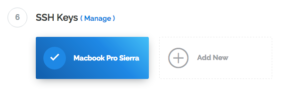
If you opt out of setting up SSH keys then the tutorial will still work the same, except that you will need to type in the username and password ALOT! So if you decide to skip SSH keys just know that you will be typing the password a lot and that you are actually less secure. It really is a win-win setting up SSH keys.
E. Server Hostname and/or Label
This setting is a little different between hosts, but it is basically asking you what you want to call the server. On DigitalOcean it will not ask for the hostname, only the label. Just use a friendly name to describe your application so you know what server this does when looking at all your servers on the dashboard screen. The same goes with Vultr as you want to know what this server does when looking at the dashboard screen, but Vultr also asks for a Server Hostname. I usually just set this to localhost for now. You can change this later.
F. Deploy
Click the final button to deploy and create your server. It will take about 1 minute to set up the server and then you will be able to log in and get started.
Step 2: Log-In via SSH
Before we get too carried away, make sure you have a way to SSH into your new server.
Linux and Mac You’re Covered
If you are using Linux (on your local machine) or MacOS then you will have SSH capabilities by default. You don’t need to do anything to set it up, you will simply use your Terminal and use the ssh command which we will cover in a second.
Windows Install SSH Client
Of course for some reason Windows doesn’t have this built in (as usual with most web development stuff) so you need to install an SSH client. Most Windows users use puTTY as an SSH client. You can download puTTY from their site.
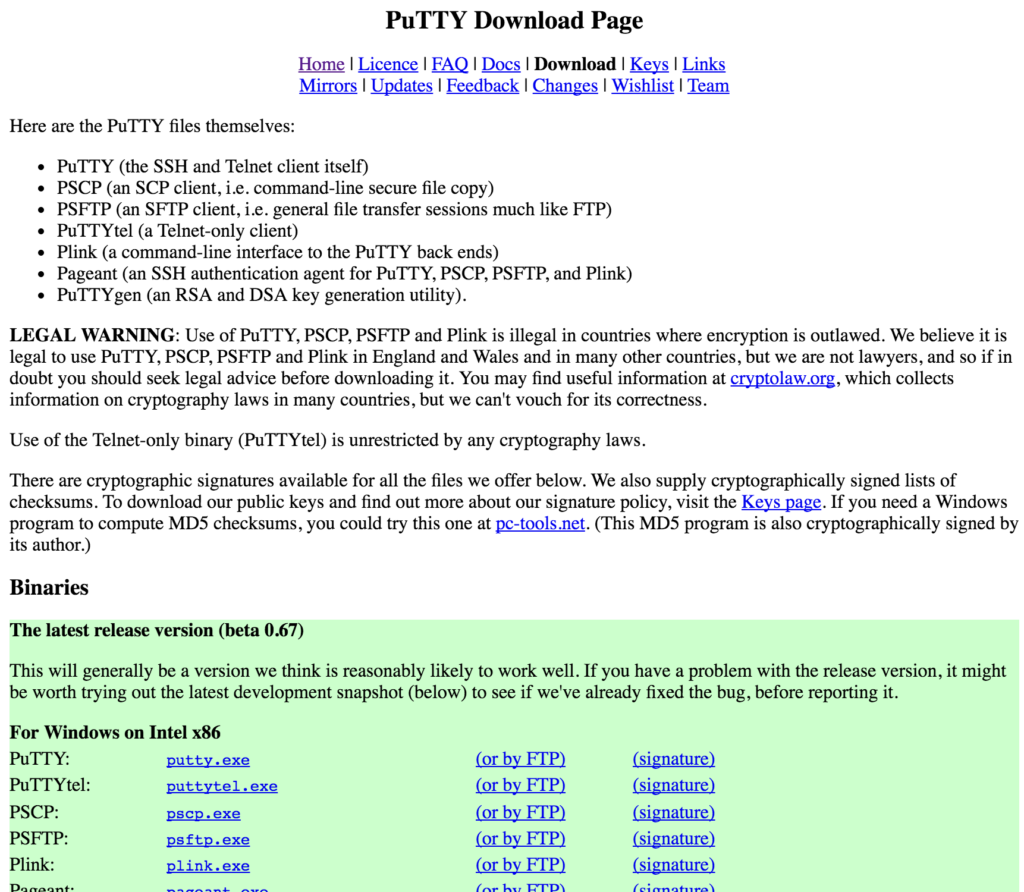
You will notice that it feels like you are downloading a virus. Their website has a very Web1.0 feel. Everyone give a round of applause welcoming our Windows users to the 21st century.
Logging Into Our Server
Now that you have an SSH client, it is time to log into our server so we can set it up. In the terminal type:
ssh [email protected] Simply replace 100.100.100.100 with the IP address for your server. You will have this IP address in your dashboard on your host, or in an email sent to you from your host after the server finished setting up. You might want to write this down somewhere nearby for the time being since we will need it several times going forward.
The first time you boot into your server and you are using SSH Keys, you will probably get a message asking you if you want to trust or add this IP address to your list of known hosts. Just agree to it to continue and you will not get this message again.
Now that you are into your server you will get a welcome message from Ubuntu.
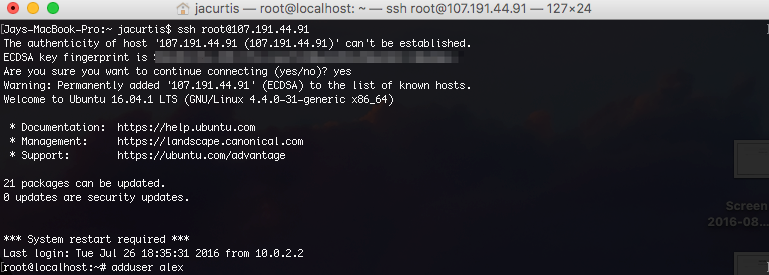
This might seem crazy but you have full access to this computer now by typing messages into this terminal. This is the same as if you had the computer in front of you with a monitor, except that your only method to “see” into the computer is with a terminal command window. We can now install programs, set preferences, and manage files just like you would on any new computer, but via the SSH terminal window.
Step 3: Update Package Installer
We will be using the Apt-Get package installer to install new programs on our server. Think of this like the Apple App Store or Google Play Store, except not as cool looking, and it is for Linux programs.
Before we start installing things, let’s make sure that our Apt-Get Installer is up to date. To do this just tell it to update with this command:
sudo apt-get update
You will see a bunch of text, and eventually you will get your command prompt again. I encourage you to read some of the output to get used to how apt-get works. The chances of this failing are pretty small, so everyone should be able to move on easily from here.
Note: as a side note, you will see us using the term sudo in front of many of the commands in this tutorial. Sudo stands for “super-user do” and tells our computer to do whatever we are asking as the super user. The super user is basically the admin. By default we are using the root user which has super user privileges. In more advanced tutorials you might make another account for yourself and then give yourself super user privileges. For simplicity we will be using the root user account in this tutorial.
Step 4: Install Nginx
Now that we are up to date with our installer, let’s use it to install our server Nginx.
sudo apt-get install nginx
It is surprising how easy this is. If you are using Ubuntu 16.04, then Nginx will even start running itself after being installed.
In fact you should be able to now visit your IP-Address and you will see that Nginx is working. You could even share this URL with your friends and they would be able to see it too (of course I don’t know why you would want to).
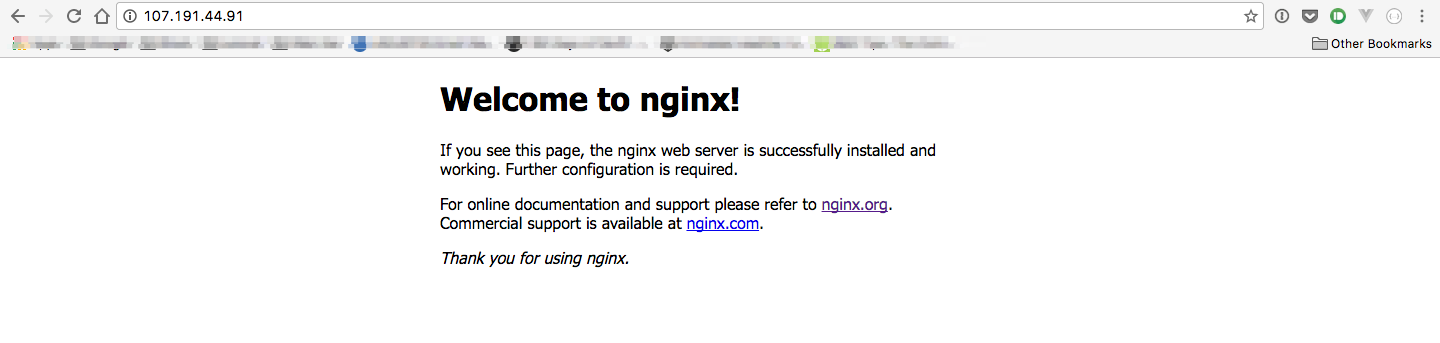
Some configuration is still needed to get Nginx to show our Laravel app, but we will come back to that. We need to set up a few other things first such as Mysql and PHP.
Step 5: Install MySQL
Ok, a server isn’t much use without a database. In fact our Laravel application is kind of a waste unless we have a database to store our information (otherwise why not make a single page app or plain old HTML?).
Of course you could always install another database, but we will be installing MySQL here. To get started, we need to use Apt-Get to go install the base Mysql Install.
sudo apt-get install mysql-server
This will start installing MySQL. Let the install run until a bright pink/purple screen pops up. This might just be the worst color selection for any terminal application ever, but there isn’t much we can do about it but to embrace it. You will want to type in a password to use for the root MySQL user. Choose something secure here and then click the enter key.

After you make your first password it will ask you to confirm. Obviously make sure they match. Also, this is a password you need to remember. So make sure you store the password somewhere safe or it is something you can remember. You will be using this password a lot going forward.
Once your command line finished and displays the root@localhost:~# line again, then you know you are complete with MySQL.
Secure your Install
You know that friend that just has that reputation for being the person you can’t tell a secret to no matter what? Well MySQL has a reputation for being unsecure. It is not because it is unsecure itself, but because most people that set it up leave many default settings in place and the default settings are not secure at all. For example, on my local computer my MySQL doesn’t even have a password at all and the only user is root. This is ok because it is only on my local computer and because it doesn’t store anything important, but on your server this is a bad idea.
MySQL luckily has a nice helper script which gets rid of a lot of these bad habits that MySQL has. For example it makes sure you don’t have an empty password for your root user, it gets rid of the test database, and removes remote root user access. These setting changes will make your MySQL more secure. To get all these security fixes to take effect, just type this into the terminal:
sudo mysql_secure_installation
Depending on your version it might ask you to install the VALIDATE PASSWORD plugin. I personally don’t think this is necessary since I will have control over making new users and I will make sure the passwords are secure enough, so I will skip over this setting. (Type ‘N’).
VALIDATE PASSWORD PLUGIN can be used to test passwords
and improve security. It checks the strength of password
and allows the users to set only those passwords which are
secure enough. Would you like to setup VALIDATE PASSWORD plugin?

Press y|Y for Yes, any other key for No:
Next it will ask you if you want to change the existing password for root user. If you just set a secure password in the last step then you can also skip this question by pressing any key (other than ‘Y’). If you left the password blank or set up a silly password (like ‘password’ or ‘1234’) then go ahead and change your password now.
Next it will ask you to remove an anonymous user. Type Y to remove the anonymous users, this is a major security risk.
Now it will ask if you want to Disallow root login remotely? and you should also select Y for this.
Another prompt asks to Remove test database and access to it? This is a good idea to do, so type Y again for this.
It may also ask to reload privilege tables now? This is always a good idea, so type Y again.
The terminal will tell you All Done! With this announcement we now have a LEM stack, which really isn’t a think. But I thought you would like to know your progress as we just completed the M in LEMP with our MySQL instance. Now let’s finish it up and get the P.
Step 6: Install PHP
Ok I kind of tricked you, because your Ubuntu instance probably already has base PHP set up. But you need to set up PHP for processing. This comes in the form of a plugin called php-fpm which is a boring as hell name which sounds much cooler in its full version “FastCGI Process Manager”.
We need to install both php-fpm and while we are at it, we will grab php-mysql which as you might guess, allows us to use PHP to talk to MySQL. Lastly we will install php-mbstring which is a requirement for Laravel.
sudo apt-get install php-fpm php-mysql php-mbstring
At the time of this writing, this will install the cool new version of PHP, version 7! With PHP now installed, we have our full LEMP stack installed.
Step 7: Configure PHP
With the stack installed, it is now time to configure everything to get it working. There isn’t much to configure with PHP, but there is one small security fix we need to make.
In your terminal, open up your php.ini file in whatever text editor you wish (VIM, or eMacs) but for simplicity, we will use Nano in this tutorial.
sudo nano /etc/php/7.0/fpm/php.ini
The line we need to edit is cgi.fix_pathinfo=0 so you can either search for it like a needle in a haystack, or you can search for it using Ctrl+W , I personally recommend searching for it.
Press Ctrl+W and now type in cgi.fix_pathinfo= and click enter. This will take you to the right line right away. You will see a semicolon the left of this line. Delete the semi colon and then change the 1 into a 0 and save the file. The file should look like this upon saving:
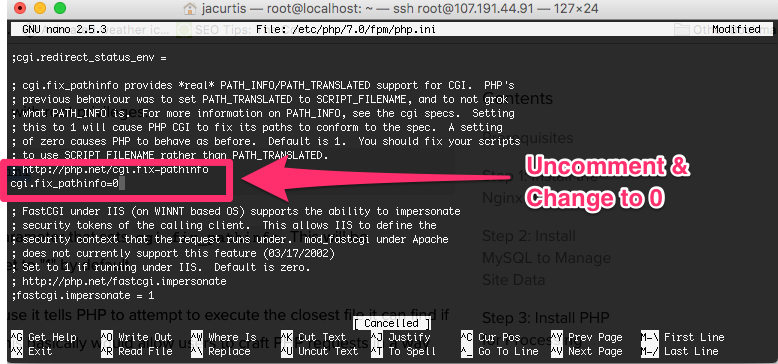
To save something in Nano, just press Ctrl+X and type Y and then press Enter.
Before the changes can take effect we need to restart php-fpm by typing in this command:
sudo systemctl restart php7.0-fpm
Now our change has taken effect.
Step 7: Configure Nginx
Here is where things will start to get a little tricky. Get your thinking caps on and lets configure our server engine. All the configuration we need to make is in the following config file. Go ahead and open it up in Nano using the following command (use another editor if you prefer).
sudo nano /etc/nginx/sites-available/default
You will see a lot of lines with # in front of them, these are comments. For simplicity, we will remove comments in this tutorial to make it easier to see what changed.
server {
    listen 80 default_server;
    listen [::]:80 default_server;

    root /var/www/html;
    index index.html index.htm index.nginx-debian.html;

    server_name _;

    location / {
        try_files $uri $uri/ =404;
    }
}
The first change we need to make to this file is to allow it to recognize index.php as a valid file to deliver.
In the line with all of the index names, we will add index.php to the list of allowed file types to deliver by default. What this line tells Nginx is to first look for an index file, then look for an index.php file, then an index.html file and so forth. It will start at the beginning and work down until it finds a matching file. Then the matching file is what is sent to the user. We want it to deliver an index.php file before an index.html file, so the order is important here. Add the red text shown below.
server {
    listen 80 default_server;
    listen [::]:80 default_server;

    root /var/www/html;
    index index.php index.html index.htm index.nginx-debian.html;

    server_name _;

    location / {
        try_files $uri $uri/ =404;
    }
}
Next we need to add our public domain or IP address to the server_name line. This tells Nginx the domain to respond to. I am going to use an IP address for this tutorial since I am not setting up a domain. But if you have a domain name that you want this server to use then you would put the domain name here instead.
server {
    listen 80 default_server;
    listen [::]:80 default_server;

    root /var/www/html;
    index index.php index.html index.htm index.nginx-debian.html;

    server_name 107.191.44.91;

    location / {
        try_files $uri $uri/ =404;
    }
}
Now we need to do a few other housecleaning items. You will want to just trust me on these as they get more complex, but the concepts of what they accomplish should make sense to you. First things first we want to tell Nginx to use your php-fpm that we installed earlier. This will be represented by the first location block that we add (it will actually be the second on in the document though, make sure to leave the first location block alone (for now, we will come back to configure it for Laravel later).
The second location block we are adding (the third in the file) will be telling Nginx to ignore .htaccess files. This is because .htaccess files are for Apache and we are using Nginx. Sometimes Laravel files will have .htaccess files in them by default so let’s just make sure that if one gets onto our server to make sure it doesn’t interfere with anything and our users do not have access to it.
These changes are marked in red below If you scroll down in your file you will notice that these two location blocks are already written for you, just uncomment the lines if you like or write it as shown below. If you decide to uncomment the lines, make sure you leave the notes commented out and also there is a line that reads fastcgi_pass 127.0.0.1:9000 that should stay commented. Basically just make sure that your uncommented lines match what is below.
server {
    listen 80 default_server;
    listen [::]:80 default_server;

    root /var/www/html;
    index index.php index.html index.htm index.nginx-debian.html;

    server_name 107.191.44.91;

    location / {
        try_files $uri $uri/ =404;
    }

    location ~ \.php$ {
        include snippets/fastcgi-php.conf;
        fastcgi_pass unix:/run/php/php7.0-fpm.sock;
    }

    location ~ /\.ht {
        deny all;
    }
}
So that is all we need to do for now. We will come back to this file again in a moment, but let’s save and close it for now just to make sure everything is good to go.
To save it remember to press Ctrl + X and then type Y and then press enter.
Now that we have saved the file, make sure it is error free by typing:
sudo nginx -t
If everything was correct then you should get this notice when submitting the command:
nginx: the configuration file /etc/nginx/nginx.conf syntax is ok
nginx: configuration file /etc/nginx/nginx.conf test is successful
This means you have no errors. Good work, now to let it take effect you can restart Nginx:
sudo systemctl reload nginx
With this set up, you are now ready to deploy any PHP application. The server is all set up to accept and deliver it. So in the next few steps we will set it up specifically to work for Laravel 5.
Step 8: Create A Folder for Laravel
Now that our server is ready to serve files, lets get Laravel files set up so that our server can do what it was born to do and serve them. By default Nginx will look in our /var/www/ folder as the root of where to serve files. So we will add another folder in here called laravel (or whatever you want to call it) and place our Laravel app there.
sudo mkdir -p /var/www/laravelNow we have a folder to store Laravel in. Let’s update Nginx so that it knows about this folder. Of course we don’t just tell Nginx about the folder, we need to tell it where to find the default page to run whenever there is a web request. This means we need to understand something about Laravel first.
In Laravel, there is a file called index.php in our public directory. This file is a php file that is actually most of the magic behind Laravel. Regardless of our routes, we always want to load this file. This file then grabs information about the request and sends it to our routes file (in routes/web.php in Laravel 5.3) which then parses the url that was passed into it to determine which controller to send it over to. When the routes file determines which controller and action to implement it does so, executes your controller action, which most likely returns a view that is what ultimately is returned to the user.
The reason that this workflow is important to understand is that regardless of which route you go to, the page that is always loaded is the index.php page. All the routes and views that you see are actually the result of loading this same page on every request. I share this information with you to explain that we just need to tell Nginx to always load the index.php page no matter what, and after that Laravel will do the rest.
In order to update Nginx, we are going to edit the same file we edited before. I will use Nano again, using this command:
sudo nano /etc/nginx/sites-available/defaultThis time our focus will be on the root line which is the location that Nginx starts looking for a file to send back to the user. Right now it will default to /var/www/html which is actually just fine location for our app if you want to use it. But we will change it to the laravel/ folder that we just created.
server {
    listen 80 default_server;
    listen [::]:80 default_server ipv6only=on;

    root /var/www/laravel/public;
    index index.php index.html index.htm;

    server_name 100.100.100.100;

    location / {
            try_files $uri $uri/ =404;
    }

    # more location blocks continue below
    # (no changes needed beyond this point)
Just edit the one red line on root, even though the rest of the file is not displayed above, leave it how it was in the previous steps, only edited the red text.
You will now see that we point to the laravel/public/ directory. This is because the index.php file that we want to use is inside the public/ folder. You can see below that once it gets in that folder it will start looking for index and then index.php where it will find our file and then in turn execute Laravel.
Finally you might remember how I said that the index.php file collects the query data in order to pass it into Laravel. Well we need to do that now, attaching our query string onto the end of the index.php. We will do this after the $uri and $uri/ so that if there is something that needs to overwrite Laravel, they can execute before it gets to Laravel. An example of this is like if you have example.com/phpmyadmin you want the phpmyadmin uri to execute before Laravel. But most stuff will just get caught by Laravel. We also remove the 404 error because we will let Laravel decide if something needs to respond with a 404 error.
Change only the red text and leave everything as it was (remember that the server_name on this example will not match your file, yours will either be the domain name or IP address you were given):
server {
        listen 80 default_server;
        listen [::]:80 default_server ipv6only=on;

        root /var/www/laravel/public;
        index index.php index.html index.htm;

        server_name 100.100.100.100;

        location / {
                try_files $uri $uri/ /index.php?$query_string;
        }

        # more location blocks continue below
        # (no changes needed beyond this point)
Now make sure to save the file (Ctrl + X and then Y and then press the enter key). Once you are back at your ssh session (exited Nano) you can restart Nginx so the changes we made take effect.
sudo service nginx restartTry visiting your url now in the browser and if everything worked then you should now get a 404 page instead of the Nginx success page (this is actually a GOOD thing). This is because now Nginx is pointing at the Laravel folder (specifically the public folder inside the Laravel folder) instead of the html folder which contains that success page. Of course we haven’t installed Laravel yet, so that public folder doesn’t exist, hence the 404 error.
Step 9: Create Swap File (Optional)
Before we install composer or Laravel, we need to think about memory. Installing these applications require a larger download (compared to the other little stuff we have been downloading) and might potentially eat up all of our RAM if we are on a smaller server with less than 1Gb of memory. So if your server has more than 1Gb of memory then you can probably skip this step. If not, then it’s a good idea to create a swap file to accomodate the extra download sizes and leave some memory in RAM for our server to run during the download.
Building a swap file allows the operating system to move data off the RAM memory and onto the SSD when it doesn’t have enough space. This is mostly only important while installing larger applications.
We will create a 1Gb swap file on the SSD:
sudo fallocate -l 1G /swapfileNow we tell Ubuntu to format it as swap space:
sudo mkswap /swapfileAnd finally to start using it we type:
sudo swapon /swapfileNow we are good to install larger stuff.
Step 10: Install Composer
You have installed composer before (otherwise you wouldn’t have made it to this point in your life where you are reading a tutorial about how to deploy a Laravel app), and this is no different than before. Follow the instructions just like on the GetComposer.org website.
cd ~
curl -sS https://getcomposer.org/installer | php
Now we have composer.phar in our home folder, and it’s time to move it into our bin so we can use composer commands easier by just typing composer.
sudo mv composer.phar /usr/local/bin/composer
You can try typing `composer right now and you should get all the composer help files you are used to getting when using it on your local computer. Hopefully you are starting to feel at home.
Step 11: Install Git
Since the year is 2016 and not 2006 you really should be using git to deploy your application. So you could always use SFTP to get your Laravel 5.3 app onto your server, but that is not only less secure, but it also WAY SLOWER. While it might work fine the first time, it becomes a pain in the ass for future updates. Using git, pushing to our server is effortless and has virtually no downtime.
We will install Git onto our server now in a folder called /var/repo/ which is near our Nginx folder of /var/www/laravel/. Let’s make the folder now.
cd /var
mkdir repo && cd repo
This will move us into our /var/ directory and then make a new directory called repo/ and then move us into that folder. You should now be inside /var/repo/ when you execute the next commands.
mkdir site.git && cd site.git
git init --bare
The --bare flag might be a new one for you, and that is because it is generally only used on servers. A bare repo is a special kind of repo whose sole purpose is to receive pushes from developers. You can learn more about these types of repositories from the official git site.
We now have a git repository in /var/repo/site.git congratulations!
Step 12: Setting Up Git Hooks
Git repositories have a cool feature called hooks that we are going to use to move our files after a git push. Think of git hooks like webhooks or maybe wordpress hooks. Basically you can create scripts that execute when certain hooks are triggered. There are three hooks available through Git: pre-receive, post-receive, and update.
We will focus on the post-receive hook which triggers after the repo has fully downloaded your files and completed receiving a push.
To set up hooks we need to move into the hooks directory inside of our site.git folder. In /var/repo/site.git# we can type ls to see all the files and folders inside. You will see the hooks/ directory which we need to cd into.
Once you are inside the hooks/ directory we are going to create the post-receive script. We will be using a new command called touch which makes an empty file.
sudo nano post-receive
Now you will open up a blank file in Nano (terminal text editor). Type the next two lines into the file and save and exit the file.
#!/bin/sh
git --work-tree=/var/www/laravel --git-dir=/var/repo/site.git checkout -f
Now save and exit (the same way we keep doing it Ctrl + X then Y to confirm the save and enter to save it as /var/repo/site.git/hooks/post-receive. This file is where all of the magic happens.
The --work-tree= tells git where to copy received files to after it has completed. We set it to point to the folder for our Laravel application that we made earlier. The --git-dir= tells git where the bare git directory is that has received the files. It is that simple. Make sure that the whole command is on one line (including the checkout -f).
After you save the /var/repo/site.git/hooks/post-receive file, you need to make one last command before we leave this folder and push our files up. The post-receive file needs execution permissions in order to copy these files over. So we can do that really quick with one line of code. Make sure you are still in /var/repo/site.git/hooks/ folder when you type this command:
sudo chmod +x post-receive
That is it! Now when we push to this repository on our server, the files will be placed in our /var/www/laravel/ directory and Nginx can begin to serve them to our users.
We are now done on our server for now, we need to exit the ssh session to access our local machine for the next step. Type the following command to end your ssh session.
exit
Your command prompt should now change to the name of your computer instead of root@localhost#. This indicates you are no longer on your server and you are making changes now to your local computer.
Step 12: Set up our Local Computer to Push to Production
Now that our server is set up to receive the files, let’s set up our local computer so that it can push the files to our server. We will be using git, so make sure that your local computer’s laravel directory is under git version control before you continue.
Just like when we push our files up to github, we set up a git remote called origin that represents github. So when we want to push to github we make a command like this git push origin branchname. This tells git to push the branch (branchname in this example) to our origin remote.
Now in the same fashion that we set up github as a push location, we will also set up our new server as a push location. I like to call this remote by the name production which represents our live production website. The goal is that after we set it up, we can tell it to push to our server from our local computer by just typing the command git push production master and this will push the master branch to our production server. You can continue to push to github using git push origin master but then when you are ready to make changes go live you will run the push to production.
Note: You can create as many “remotes” as you want in git. It is common to have a secondary server called “staging” which is where push your project to for quality testing before pushing to a live site. The staging site is like a beta for you to test internally in a production-like enviroment before the whole world sees it in real production. In this case you could create another server (just following the directions in this tutorial again) and create another “remote” called “staging”. Now you can use a command like git push staging master to push to staging for testing. Then when you feel that the version is safe for the public, you can run git push production master to push it to the production server. You can also set up other remote servers for git backups (like gitlab) or testing servers, or alpha tests and stuff.
To set up a new remote you use the git remote add command. Before you do this make sure you are in the correct location. First of all you should no longer be on your server. If you still see root@localhost# in your prompt then you are on your server still. Type exit and click enter to leave the server. You should see the name of your computer in the command prompt now. Use cd commands to get into your laravel project folder that you want to push to the server. In my case my project is under /Sites/blog so i type this to get into my folder via the terminal:
cd Sites/blog
Also make sure you have git setup for this project. I am assuming you have already made at least one commit (but probably many) and you are currently on your master branch which contains your latest production-ready code.
Make sure that you substitute the red text with your domain name or IP address that you use to ssh into your server.
git remote add production ssh://root@example.com/var/repo/site.git
Make sure to substitute the red text with your domain or IP address. The command should mimic the ssh command you use to log into your server. So if you type ssh [email protected] to get into your server than 100.100.100.1 is what it should show on the command above.
With this command we now created a remote called production that sends our files to the new bare git repo we made on our server.
Now once again, assuming your project code is production ready and is on your master branch then you can type this command to push it up to your server:
git push production master
The output will look just like when you push to github, but this time you are pushing to your own server! Let’s log back into our server now to make sure it worked.
Step 13: Verify our Git Hook Works
Now let’s make sure our code is in the right place. It should be in our /var/www/laravel/ folder on our server. It is easy to check, jut log back into your server and look at the directory.
ssh root@example.com
Remember that example.com needs to be changed to your domain or ip address. Now cd into your laravel folder.
cd /var/www/laravel
ls
You should now see what appears to be a Laravel project. You can poke around but it should mimic your files from your local computer. Honestly anything in here is a good sign because it was empty the last time we logged off the server. If you have your Laravel project in here then you have done everything right.
Step 14: Run Composer
Hey remember when we installed composer a while ago? Well let’s use it. Now that we have Laravel on our server and all the files we need, lets run composer to get it working. Make sure you are in /var/www/laravel/ when you run composer commands because you want to be inside your laravel project.
composer install --no-dev
The --no-dev command flag is very important. Without it, composer will try to install a bunch of stuff that you do not need on production. It is also very likely that the install will fail as well, since some of the dev dependencies won’t work on our server. By adding --no-dev we are only installing the main require elements and not other random things.
Step 15: Laravel Permissions
In order to run, Nginx needs certain permissions over the Laravel directory we made. We need to first change ownership of the laravel directory to our web group.
sudo chown -R :www-data /var/www/laravelNow the web group owns the files instead of the root user. Next we need to give the web group write privileges over our storage directory so it can write to this folder. This is where you store log files, cache, and even file uploads.
sudo chmod -R 775 /var/www/laravel/storageNow go to your web browser and type in your domain or IP address to attempt to view the site. What do you see?

If everything went “right” then you should see an error, Haha. This time though you will see a Laravel error, however which actually means that now Laravel is working. You know the all-to-familiar “Whoops something went wrong!” message and should recognize it with Laravel. If you tried this before then you got a simple 500 server error displayed by your browser, not by Laravel. The fact we see this error is actually a good thing because it means that Laravel is giving us the error and not Nginx.
Now I skipped a step intentionally. Before we go back and fix it, I wanted to show you how to troubleshoot on your server. If you thought troubleshooting was hard on your local machine, just wait till the world of live servers. Of course the idea is that you test your app so well before pushing to production that this never happens (trust me that is a pipe dream, every developer will experience errors on production at some point, just try to keep them to a minimum).
You might wonder why you don’t get the stack trace or why you don’t get a message explaining what the error is, like you are used to when you ran into this screen on your local computer. This is because our Laravel environment is currently set to production so Laravel recognizes that and intentionally does not output detailed error messages when something goes wrong. This is for your security. Would you want all of your visitors to see a full stack trace of your application? No, this is like giving your stalker full access to your diary, its a terrible idea. So on production you will only see these types of messages when something goes wrong. To see what happened, we need to look at our log file. Luckily now that Laravel has access to our write to our storage/ folder, it now has the ability to create log files (which it couldn’t do before).
Let’s go take a look at our log file to see what went wrong. To find the log file, navigate to /var/www/laravel/storage/logs and if you type ls in this folder you will find a lone laravel.log file. Go ahead and open this file up in your terminal and let’s see what is inside.
nano laravel.log
You should now see the errors that you are used to seeing on the error page. This is a safe place to store error messages because the only person that can read them are people that have full access to the server. If a hacker gets full access to your server then you have much bigger problems than the fact that they can read your log files.
Here is what my log file says. Your file should look similar:
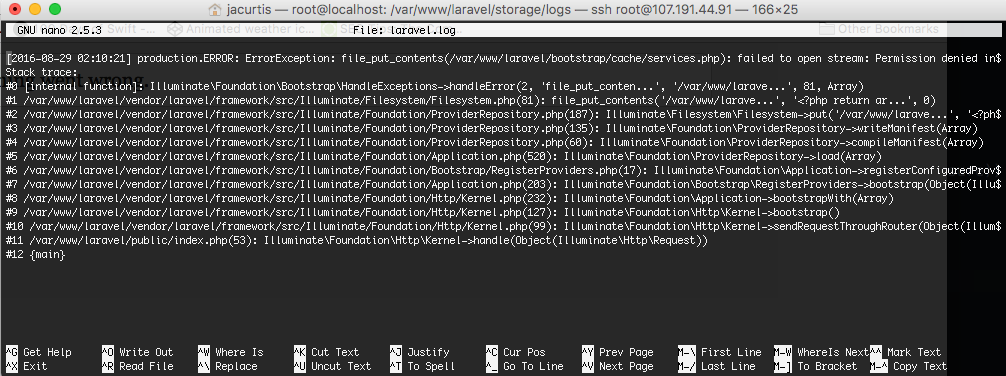
The important part is the first line which gives you the error (and the timestamp of when it happened). To help us identify the error, I added bold green text over the important parts.
[2016-08-29 02:10:21] production.ERROR: ErrorException: file_put_contents(/var/www/laravel/bootstrap/cache/services.php): failed to open stream: Permission denied in /var/www/laravel/vendor/laravel/framework/src/Illuminate/Filesystem/Filesystem.php:81

Stack trace:

// Continues below with full stack trace...
Basically this error says that it is unable to write to the /boostrap/cache/ folder. If we look at the Laravel Installation Documentation we can see that we were supposed to make the boostrap/cache/ folder writable in addition to the /storage/ folder. So let’s go back and fix that.
sudo chmod -R 775 /var/www/laravel/bootstrap/cache
Ok, now the cache folder is writable. There are a few things though that we need to do. But we are getting really close to our app being ready to deploy.
Step 16: Database Setup
So we installed MySQL a while back, but we haven’t set up an actual database inside of it yet to store our application data. So now is the time to go set that up, so that we can configure it and run our migrations.
Lets get into MySQL by typing the following command:
mysql -u root -p'yourpassword'
Make sure to change the red text with your actual password (but keep the single quotation marks). Also note that there is no space between the -p and the first quotation mark.
Now you will see a command prompt change to:
mysql>
This indicates that you are in the MySQL CLI now instead of the ssh. We aren’t going to learn all of the MySQL CLI commands here today, just the essential ones.
SHOW DATABASES;
This will show you all of the databases you have on this system. Now we need to make a new database for our Laravel app to use. You can call it whatever you want. Just make sure to remember the name and keep it all lowercase.
CREATE DATABASE blog;
The red text is where you substitute the name of your new database. I called it blog in this case.
Now if you wanted, you could run SHOW DATABASES; again and you will find the list of databases and your new database should be in the list.
That is all we needed. We have set up our database now, we can configure Laravel to start using it and then run migrations onto it.
To leave the MySQL command prompt you simply type:
exit
MySQL is super friendly and will say ‘Bye’.
Step 17: Configuring Laravel
Now all we have left is to configure our Laravel app. This is the same way you would configure your Laravel app on your computer. We will use the config files and also set up a .env file. Remember that when we push to production that any file in our .gitignore will not be sent to our server. So any of those files need to be set up again. If done correctly, this isn’t a big deal, your node_modules should not be there, or your vendor files, which is ok because you don’t need them on production (you should use Elixir to compile the ones you need into your public/ or resources/assets/ folders prior to pushing to production).
Also remember that by default your storage directory is in your .gitignore file which means that anything stored in there (like user avatars) will not be transferred to the server. This is by design, but explaining this design decision is more complicated than we can get into right now.
It is just a good idea to look at your .gitignore and understand that everything in your .gitignore file will NOT be on the server. If you see something important on there than you either need to recreate it on your server or you need to edit your .gitignore file so that it includes it in your repository.
Understanding the .env File
Really the only important file in your .gitignore file that our application really needs is the .env file. Now once again this is by design, so do not hastily remove it from the .gitignore file. Keep it in there, because it is very dangerous to put your .env file into your repository. The .env will contain private information, passwords, SMTP credentials, API keys, and more that all need to be kept very secret. So you should make a .env file for your server that represents your production environment and this will be different from the one on your local machine which contains information for your local enviroment.
For example, you might use mailtrap.io as your mail server on local, so that is the settings you put in your .env file under SMTP settings. However on production we need an actual SMTP server to send real emails from so the server’s .env file will contain your SMTP credentials for SendGrid, Amazon SES, or whatever you choose to use for mail delivery.
Another example is database information, which will be different between your local and production enviroments. Some devs even use different database drivers, opting for SQLite on local and PostgreSQL in production.
Once you have a .env file set up for your server and one for your local then you can push your code between your local computer and your server and the different settings will instantly take effect. Because git doesn’t touch your .env file, then it will not change when the other code is pushed, but Laravel will use the information in the .env to run everything.
Ok, I think we now know why we use a .env file, so now let’s create one for our server.
Creating our .env file
One file is kept in our git repo and that is the .env.example. This is an example .env file that we can use to get started. So we will start with this example file to create our server .env. Lets copy the .env.example and rename it .env. We want to copy instead of move because that way the .env.example file doesn’t get pulled from the repo and we can use it again later as a template if we mess up.
To copy and rename the file we will use the cp linux command. Make sure before you do this that you are inside your laravel folder (in /var/www/laravel/) because that is where the .env.example is located.
To make sure that you are in the right place, run the ls command but run it with the -A flag so that you can see the hidden files (the . before the filename indicates that it is hidden).
ls -A
This should show all of your folders and files, including the hidden files. You should see your normal Laravel structure ( app/ , public/, storage/ and so forth) and also normal files like composer.json, gulpfile.js, and finally your .env.example. Now you know you are in the right spot.
Now that you are in the right spot, lets copy the file.
cp .env.example .env
If you run ls -A again then you should see your .env file next to your .env.example (they should both be there).
Now we can edit our .env by opening it with a text editor of your choice (once again we will use nano for simplicity).
nano .env
Inside this file you will be able to overwrite many of the config settings. Remember that anything in the .env file will override whatever is in the config files.
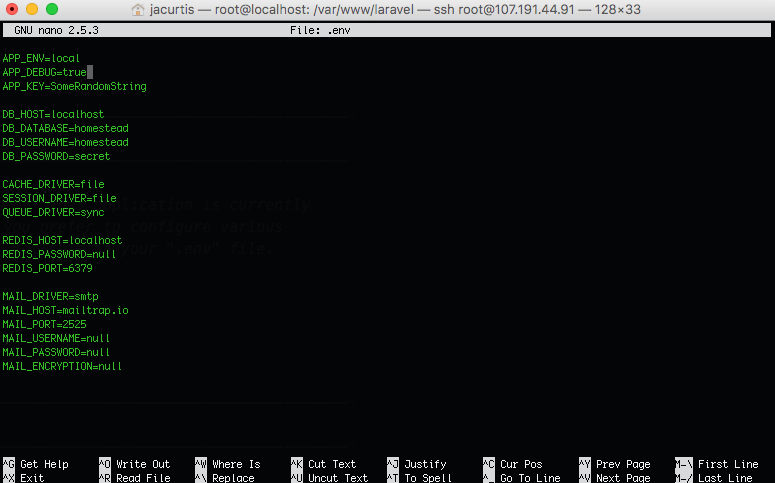
Now that we have created this .env file, it is going to override the settings in our config file. So for example, our config/app.php file has our environment set to ‘production‘ but our new .env file has the APP_ENV set to local instead. So now this will switch our application to local which is a security concern. So we either need to remove the line or change it to what we want.
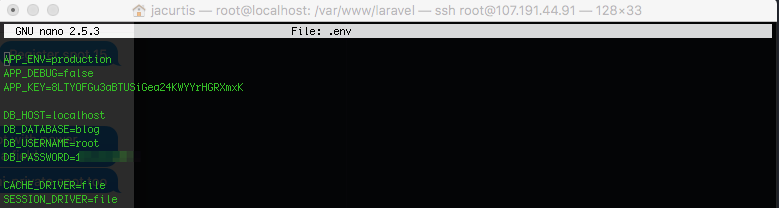
APP_DEBUG is what sets those error messages that we talked about earlier. We need to make sure that is set to false.
APP_KEY needs to also be set, but we will set that in a moment with an artisan command.
Next comes your database settings. You will need to configure your DB_HOST to be localhost, set the DB_DATABASE to be the name of the database we just created in the last step, and then set your username and password for the database in the DB_USERNAME and DB_PASSWORD fields.
You might want to adjust your cache, queue, and session drivers if you know what you are doing. But the defaults are good for most apps.
Lastly you will want to change the MAIL settings as well. Just configure it based on the settings for your email service provider. The settings are pretty self-explanatory and outside of the scope of this tutorial.
Now Save the file using the Ctrl + X command we usually do.
APP_ENV=production
APP_DEBUG=false
APP_KEY=SomeRandomString

DB_HOST=localhost
DB_DATABASE=blog
DB_USERNAME=root
DB_PASSWORD=XXXXXXXXX

CACHE_DRIVER=file
SESSION_DRIVER=file
QUEUE_DRIVER=sync

REDIS_HOST=localhost
REDIS_PASSWORD=null
REDIS_PORT=6379

MAIL_DRIVER=smtp
MAIL_HOST=sendgrid.com
MAIL_PORT=2525
MAIL_USERNAME=XXXXXXXXXXX
MAIL_PASSWORD=XXXXXXXXXXX
MAIL_ENCRYPTION=null
Take extra care to make sure the red parts get changed. If you are not using Redis database then you can delete those lines (but keeping them in won’t hurt anything either). Take extra care to double check that the APP_ENV is set to production and that APP_DEBUG is set to false.
I always like to take a look at my local .env file as well just to make sure that I didn’t add any other .env settings while building my app. An example is in many of my apps I create a GOOGLE_MAPS_API setting to pull my Google Maps API key. If I forget to add that to my production .env file then my maps won’t work and I will have javascript errors.
We should now have most of our app set up. Just a few more configurations to make.
Encryption Key
There is one line we left default in our .env file, the APP_KEY. Laravel needs this key to be set up in order to encrypt our sessions, cookies, and passwords. This needs to be a random key that is unique to our application to make everything more secure. We can generate this key with an artisan command. Remember those? Yeah, we can use those directly on our server, just like we did on our local computer.
Let’s run the artisan command to generate a secure encryption key.
php artisan key:generate
After clicking enter you should see a green line that says:
Application key [8LTYOFGu3aBTUSiGea24KWYYrHGRXmxK] set successfully.
Of course the long number inside the square brackets will be different for you, because it is supposed to be random.
If you are curious, this artisan command will actually write to your .env file for you. So you really don’t need to do anything. But for the adventerous among you, go back to your .env file and look inside.
nano .env
You should see the APP_KEY filled out now with your random key.
A Few More Config Settings To Change
Our .env file is complete, but there are just a few more settings we want to change before we are live. These settings are all in our config/ files.
In config/app.php there are a few things to edit. Set the 'url' to your actual domain name. Also make sure that your 'timezone' is set correctly too. This needs to be an officially supported PHP time zone string. If you are not sure what your timezone string is, you can find the official timezone strings on the PHP Manual.
<?php

return [
    'env' => env('APP_ENV', 'production'),

    'debug' => env('APP_DEBUG', false),

    'url' => 'http://example.com',

    'timezone' => 'America/Denver',

    'locale' => 'en',

    'fallback_locale' => 'en',

    [CONTINUES BELOW]
]
Change the red sections (note that comments were removed for readability). Save the file and you are done with your configuration.
Cache Configuration Settings
You might have noticed that there are lots of config files in our application. They inherite and cross reference eachother, all of which makes the configuration easier to read, but slower for PHP to compile on the fly.
Because of this, it is a good idea to cache all of the configuration settings into one cached config file. We can do this with another artisan command.
In your terminal (in the /var/www/laravel/ folder):
php artisan config:cache
This will output:
Configuration cache cleared!
Configuration cached successfully!
Now all of our configuration settings are compiled together into one quick file. Of course don’t forget now that they are cached. So if you make another change to your .env file or to a file in your config/ folder, that you need to also recompile the config cache before it will take effect.
Step 18: Migrate our Database
Now that everything else is set up you can actually run your app. The only problem you might still have is that if your app relies on a database, then you need to migrate your database. We do this in much the same way as on our local computer. At this point our configuration files should have everything we need to set up and communicate with our database, so migrating now should be simple.
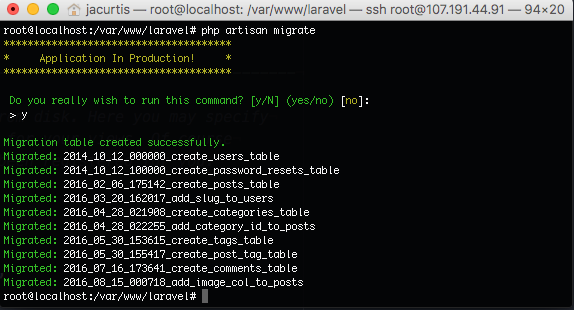
php artisan migrate
This will warn you that your app is in production and make sure that you want to actually run your migrations. The default setting is “no” also so its very difficult to accidentally migrate your live database. This can be good because sometimes you might forget you are logged into your server on SSH and just grab the nearest terminal window to run what you think are local migrations, but really they are production migrations. This script makes sure we know what we are doing.
Type Y to continue and migrate your database.
That’s it! Your database is now set up and ready to go.
Step 19: Miscellaneous Things
That is it! We have everything set up we need in order to start using our application on production. Remember that you have a database, but the database is empty. You might need to create a default admin user or something. You can run a database seed now if you have one set up. You can run it using the artisan command:
php artisan db:seed
Or if you do not have a seed setup then you can run:
php artisan tinker
This opens up a console where you can add Laravel commands and execute them immediately. To make a new default user for example you could use:
$user = new App\User;
$user->name = 'Alex Curtis';
$user->email = '[email protected]';
$user->password = Hash::make('password');
$user->save();

exit
This will create a user in our database named Alex Curtis with an email of [email protected] and a password of password (it will save the hashed version of course, but password would be the password we type in).
You might also need to start a queue worker and other various tasks like that. But if you navigate over the browser you should now have access to your full application in its entirety.
Step 20: Share with Your Friends
You have a world wide url now to share your server with your friends. Tweet it out to @_jacurtis on twitter so that I can see it as well. Also if you found this ultimate guide helpful, be sure to share it wherever great Laravel content is consumed.
Great Guide!
Would love to read a follow up about the Lamp stack though.
Thanks for your work!
Very nice article/tutorial!
Very well explained , and didactic.
I will share my blog soon.
Thanks for that!
that was helpfull hoping you would pls do a video tutorial on deployment…thank you
The video series is live on YouTube.
Very Nice Work .
well explained!!
always love to listen and read ” JACURTIS”
he is really driving my ideas to the next level.
Thanks.
Thanks so much! I am glad I have been able to help.
Hi Alex, Sorry if I ask here, What kind of search engine do you use in this website, Laravel 5.3 Scout? or something else?
This is currently wordpress (as of September 2016). Our next site is being built on Laravel and will use Algolia as the search engine.
Great work. Thanks a lot for this guide. Was searching exactly for this information.
Awesome, glad you found us here 🙂
Great Work. Specially the git hooks and deployment. But I’ve a question, how feasible it will be if we install a new library into the project via composer.
because It may cause error as soon we push it to the production. At this point, when we should install the dependencies, before or after the production push?
You can run
php artisan downon your server to put it into maintenance mode and then push your project to production from your local computer to add the new files on your server. Now go back to your server, runcomposer installin order to install those new dependencies. The server will show the maintenance screen during this time will you are installing dependencies. Once your composer install script has finished and everything is installed then you canphp artisan upto move your server out of maintenance mode and your site can now run using your new composer packages.How does the server know which git repository to watch? I can’t see where you’ve configured the server to use the git origin or production.
OK I understand now, you’re pushing from local directly to server (bypassing the github).
Correct 🙂
The server never really “knows”. Think about the git repository as a bucket. It will move anything put into that bucket over into the Laravel folder. So you can toss a Ruby on Rails project in there and it will move the Ruby on Rails project into our Laravel folder. In this way, the git repo is kind of “dumb” it just blindly does whatever is thrown at it. Likewise it doesn’t care much about where the file is pushed from. So on your local computer we set up the
productionremote which points to the address of the git bucket. But we could just as easily called it anything as long as the address points of that remote points to that git bucket (the ssh folder command). Many people call it “live” or “server” or something like that. I chose “production” in this tutorial but you can call it anything. Just set upgit remote add liveif you want to call it “live” instead of “production”. Just make sure that the SSH command is correct so it points to the right place. Then git doesn’t care from there, it will push anything that it receives from that bucket into our Laravel folder.Hey alex nice tutorial, one question , where can i buy a Domain for my application? or what you recommend , its easy to configure Domain in VULTR ? i saw some option called DNS to creat a domain but nothing happened
thanks Alex great work!!
I personally buy all my domains through [thirstylink linkid="580" linktext="Namecheap" class="thirstylink" title="Namecheap"]. I runs about $9 a year. Once you own your domain then you need to change the DNS servers to point to Vultr. I can do a tutorial on this soon because it has been a popular question.
Please do a tutorial on this soon. Its what am trying to figure our at the moment. And thanks a lot for this tutorial.
I’ve tried following step by step on a Digital Ocean droplet to no avail – that’s whether I try to push the files through git, or if I bypass that stage all all together. I wind up with a 404 Nginx error. I’m using PHP 7 on 16.04 LTS.
Nginx config: http://pastebin.com/fTDF0AYp
Add “../” after “cd” command before the path when pushing to production server.
@alex ..of all the bunchs of laravel tutorial on youtube we can’t find a simple mature laravel tutorial project on Ecommerce-website..pls you really need to help us with that to keep moving the DEVMARKETKER.io community forward..
Yes the E-Commerce series is coming up soon. It is a large undertaking and so it takes some time. It will be well worth the wait though 🙂
@alex hope one day to be like you base on programming..currently am 25 i hav been learning JavaScript and php evryday on YouTube tutorials for the past nine months now..is there any possibilities in the next two years i wil been finishing a live production project for client…thanks for your guardians
Yes for sure! Code every day and you will learn so fast. Force yourself to do things you don’t know how to do and it will push you to learn more. Best of luck and stay in touch!
Hi Alex, I just signed up to vulture by following your link and linked my card but I haven’t got the $20 credit, did you have to enter a code or anything to activate it?
Thanks
It should happen automatically. Try asking Vultr support about the credit.
Hi Alex,
Thanks for the great tutorial! Well written, with good background info!
Regarding the GIT hooks etc. – is it possible to have the Staging and Production repo on the same server? How would you distinguish the two when defining them locally and remote?
Thanks!
Matthi
Yes you can, in fact I am doing this right now on one of my live enterprise level software projects. We have staging set up as a secondary server in Nginx. Basically we route all beta.domain.com requests through to a secondary staging directory. So we tell Nginx to use a different folder when someone is using the beta.* subdomain.
Then when I want to test changes on staging I push to that folder instead of master. Changes are reflected now on the beta.domain.com but not on domain.com. This allows my team to test things and when we are ready we then push to master to get the new changes to show on the live site. It works very well.
In fact I have three environments: staging, beta, and live. Staging has a testing database with dummy data but otherwise the full code. Then we push to beta which actually shares the same server as live so that changes on beta show up on live also. This means I can use beta for real world work. This helps me catch additional bugs. Then when beta has been appropriately tested then we push to live.
You really follow the same steps as you did here. The only difference is to put your beta or staging code in its own folders at the same level as your live site. Then use Nginx server blocks to route those specific domains to the folder belonging to that domain.
thanks!
the only tutorial that worked for configurating nginx and laravel!
Thank you for this awesome work of yours! I have been searching for this for a very long time and finally found it ! Big shout to Alex
Thanks. You’re right, there is no good tutorial on how to deploy Laravel.
Ditto
Hello,
Thank you for the detailed article on how to guide. Can you just tell me how to install phpmyadmin with php7 and LEMP stack. I tried it but not getting it.
Yeah i can follow up with a PHPmyAdmin video
I’m looking forward to the followup video on PHPmyAmin, too, Alex 🙂
Hey Jeet,
Not sure if you have sorted the issue out. In case you would still be any interested, the link below has been very helpful for me to tackle the same issue.
https://www.digitalocean.com/community/tutorials/how-to-install-phpmyadmin-on-a-lemp-server
Just a quick heads-up that you need to create the symbolic link to the PHPMyAdmin folder into the public folder rather than the Laravel folder. Otherwise, it wouldn’t work.
Hope this helps! Wish you happy coding!
getting error when going to mysite.com/phpmyadmin
This tutorial doesn’t cover installing PHPMyAdmin, so unless you installed it yourself, then you won’t have it installed. You would need to install it and set it up (thats a whole other tutorial) before you can get this working.
As I understand, when you create he symbolic link, this is the right approach depending on where your domain is stored: sudo ln -s /usr/share/phpmyadmin/ /var/www/laravel/public
Yeah using symlinks is another way to achieve this. Thanks for helping.
Hey Thanks for awesome guide.
I need some help here.
I Have one IIS server with a public IP and one VM with internal IP hosting my Project.
Now the thing is i want to rout my all traffic to my My VM (which is in internal network). i tried with IIS reverse proxy and can able to route my first page e.h http://www.mydomain.com to my VM (Nginx) and it serves well but when I navigate to any other page URL is change with internal IP which is not intended here.
I don’t this question is relevant with this post or not but it would be great if some one help me out.
Thanks again Jacurtis! you are awesome.
great guide , now waiting for you ecommerce project 🙂
Thanks! It is coming soon. Just trying to find the time to truly dedicate to it.
I get this error: src-refspec-master-does-not-match-any-when-pushing-commits-in-git
All files are in the local folder, not in Github, only in local.
What am i suppose to do?
Usually when I get this error it is because you are trying to push
git pushwithout any commits. Make sure you have staged your files and committed them with a message and everything before you push to the server. This should eliminate the issue. Also, it’s good to make sure you keep some sort of cloud repository in place as a “central repo”. This can be Gitlab, Github, or BitBucket (or a custom Git server).thank you very much ….this is very help .you are awesome
awesome dude……
i uploaded my laravel project to server and its running well…but after that i did some tweek and changers to my site …so how i gonna update that changes in the server…
should i have to do whole thing again…
or there is a another way to do that….
if i push again is it work…. will it update the changes
Yes every time you make a change you just want to push to your server repo that we set up. You can push the whole project with Git and it will update the project accordingly. If you make an adjustment to your
composer.jsonthen you might need to runcomposer installagain also.Hi Alex,
1. Must I run composer install or compsoer install –no-dev after something is changed in composer.json?
2. Can I automate this process “composer install” with git ? If Dev Team is big, it is very exhausting to check, if any member in Team did some changes in composer.json and then check Server. Can we not do some script, that checks e.g. in post-receive if composer.json is changed and when yes, run “composer install” and the same thing on local?
best regards
Davit
Fantastic! The best tutorial, i tried too many times with other guides.
This guide is pure gold man, Thank you!
Thank you, please share it in your networks if you found it useful.
I can’t bevelie I’ve been going for years without knowing that.
When running `composer install –no-dev` the server warns `Do not run Composer as root/super user! See https://getcomposer.org/root for details`
Thanks for the guide. It’s been super helpful. This should be part of the laravel documentation!
Thanks so much! I agree they need better documentation on Laravel.com about this process. Technically you really should be making another user (that is not root) for yourself to SSH into the server as. This is for security reasons. I decided not to get into that here, because we were already covering enough other things. But it really is a good idea to make a different user. Some VPS hosts do this automatically. It isn’t hard to do though if you want to try.
Thank you very much!!!
Great tutorial so far! However, I am getting very stuck at the git part as I do not already have a git setup on my local machine that has a working laravel version inside of it. It sounded like you did this in a previous post. Can you please direct me to that post or give me some insight on how to accomplish this? I am on a mac. Thank you so much so far!
Yes, you can find all the tutorials on Git setup on YouTube: https://www.youtube.com/playlist?list=PLwAKR305CRO-fenwcN2-IC0rgaB6vaJgD
Hi, i’m following your instructions and got stuck when pushing to server with git.
I’ve created dir using ‘sudo’ command under ‘myusername’ not under ‘root’ user.
So when i ‘git push production master’ , i have error like shown below :
$ git push production master
Counting objects: 3058, done.
Delta compression using up to 4 threads.
Compressing objects: 100% (2982/2982), done.
remote: fatal: Unable to create temporary file ‘/var/repo/site.git/./objects/pack/tmp_pack_XXXXXX’: Permission denied
fatal: sha1 file ” write error: Broken pipe
error: failed to push some refs to ‘ssh://myusername@IP_address/var/repo/site.git’
How to fix this?
please help
How to fix problem with permission and empty laravel folder after push production
[SOLVE PROBLEM]
fatal: unable to create temporary file: permission denied’ and ‘fatal: sha1 file write error: invalid argument’
First, change bash script in vps machine:
#####################################
cd /var/repo/name-folder.git/hooks
sudo nano post-receive
#####################################
On post-receive add sudo:
#####################################
#!/bin/sh
sudo git –work-tree=/var/www/laravel –git-dir=/var/repo/name-folder.git checkout -f
#####################################
And after then:
#####################################
cd /var/repo/name-folder.git/hooks
sudo chmod +x post-receive
#####################################
Next, fix file permissions in your remote .git dir e.g.
#####################################
sudo chmod -R ug+w /var/repo/name-folder.git
sudo chown -R username-vps-machine:username-vps-machine /var/repo/name-folder.git
#####################################
or root:root if you want to assign members of root group for push access.
Then git repository on the destination host needs to be set as shared, so the following command on remote needs to be run:
#####################################
cd /var/repo/name-folder.git
git config core.sharedRepository group
#####################################
This post is incredibly complete. Excellent
Hello jacurtis, love your video. However, my organization prefers the apache server. Would love to know how to adapt the configuration of nginx to apache and which files I need to configure
Yeah that is coming soon. However i have to warn you, that Apache can only maintain about half the concurrent users (with Laravel at least) than Ngnix. Really convince them to switch to Nginx, it is the future!
Haha, that tut is coming though. I know we all get stuck with organizations sometimes that demand specifics like that.
Can you deploy multiple laravel project in one vps server? And how will you do that? Thanks! Great tutorial!
Yeah one day. It will be in my upcoming book if nothing else.
Excellent tuts.. Great friend. very useful. Loved it.. Thanks.
Thanks for your great tutorial. Would you please make a tutorial for ubuntu-nginx with wordpress multisite including custom ip setup firewall and memory limit.
Sorry for my poor English.
Thanks again
Unfortunately my days with WordPress are over. I have abandoned that framework and no longer keep up with its development.
Pingback: Ultimate Guide: Deploy Laravel 5.3 App on LEMP Stack (Ubuntu 16 and Nginx) | Knowledge Sharing
Vultr has no usable startup LEMP scripts in their docs. Create one from this and you could own that search too.
I’m new to Linux but working on the startup script. Will share when it 100% works on Vultr.
My results are contaminated but I just googled “deploy laravel Kemp guide” and got this for to result.
Thanks for your work. I keep all of your vids available offline so I can learn while driving and running.
This should seriously be part of the official Laravel docs. Nice in depth tutorial!
A tutorial on deploying with Docker would be helpful, hopefully you’ll consider the proposal 🙂
Fantastic… especially maintaining the App with git… amazing. Thanks, man!
Hey Alex can you I have have problem to view tags that belongs to the posts and displaying posts by category if you get time the plz reply.
A very helpful tutorial!
If I win the lottery, I’m going to overpay you to be my boss! Thanks for the time and effort to help others. I tweeted you and will G+ it too. I’m not on facebook.
RE: ROOT: I completely wrecked my deployment last night trying to get a non-root user to work. I know I’m missing something very simple with permissions but after hours and hours, I rm -rf’ed * and recreated server and local sites so I could at least get my updates to work. I’m not going to tell you what I did because I don’t want to take any more of your time than you feel I should. But but but… can you provide a link to something on DO or elsewhere that should help?
Where it failed was when I pushed it went fine but the hook would not update the web root. It works fine as root so I know I didn’t miss a step. Just getting the perms to jive so the hook would fire kicked my tail. In the end, I couldn’t even remember how to change every back so had to scrap. Which is a good thing. I can probably do it without your guide now!
FYI: I moved all of my stuff from Azure to Vultr because of you. Couldn’t do the coupon but wished you could get credit for it. It’s not much but it will be one day. Man it’s nice that people like you are on the Blue Planet.
Wow i am so glad you got this working finally. Thanks for writing out what helped so other people can find it helpful. I’d love to be your boss one day 😉
error in laravel log:
production.ERROR: RuntimeException: No supported encrypter found. The cipher and / or key length are invalid. in /var/www/laravel/bootstrap/cache/compiled.php:7771
Stack trace:
#0 /var/www/laravel/bootstrap/cache/compiled.php(7761): Illuminate\Encryption\EncryptionServiceProvider->getEncrypterForKeyAndCipher(NULL, ‘AES-256-CBC’)
Make sure you are generating an encryption key. This is done by typing `php artisan key:generate` inside the laravel project folder.
Hello,
Alex, First I thank you for all the great tutorials. I was watching “$this” tutorial (YouTube) and I wanted to create a VPS in order to follow you, But none of your link (for $10/$20 on DigitalOcen/Vultr) is valid now. So I cant follow you now, Coz I have money but no way to pay those companies, I’m in East Asia. I will be really happy if you do something about it,
Thank you very much again
Sorry about that, fixing it now.
Hi
Thanks for this great guide. I followed all the steps but when i pushed the master to production i saw the files going on the terminal but nothing happens on the server i can’t find the files. the Laravel folder is empty.
You might have moved them to the wrong place. Make sure you keep tabs on where you are located structurally in the server (this is shown in the command line before the `$`). It will move your files there if you arent explicit or careful. A common error is that the files get moved to your root of the server, you can check there. Otherwise its also possible that the git clone failed.
Had the same issue. I rinsed and repeated the process a bunch of times, carefully checking and rechecking everything. I even destroyed and rebuilt the server twice, but still nothing was showing up after the push. I did a lot of research on git as well thinking maybe a step might need to be taken that I missed or maybe there was a command change, anything that might correct this, but no success there. Hopefully someone might be able to provide some insight on this.
One thing I did do to solve this was clone my github copy. That bought everything over, but of course I needed to update the nginx default directory (and post-receive in ~/hooks) to the new one, and not “laravel”. After searching the entire server (and installed webmin for an interface to make it a bit easier), I was never able to find the files, so I’m not sure “where they went”…
getting error:Your requirements could not be resolved to an installable set of packages.
Deployed my first Laravel site using your tutorial.
Thanks a lot!
Can you explain what is this line doing?
sudo chown -R :www-data /var/www/laravel
This is making the `:www-data` user (which is Nginx) the permissions to be an owner (and in turn do whatever it wants) to the `/var/www/laravel/` folder. This is where our project is, so we want to make sure that our server has full access to this folder and can save files (such as file uploads) or write to files (such as log files).
Thanks Alex, as always, superb. Are you still planning on doing an Apache LAMP version? Maybe just expand this one and split for Apache/Nginx at the relevant sections. May not be that simple though.
Yes one day 🙂 Spending a lot of time starting my new company lately.
This guide is really useful and straightforward. Thanks Jacurtis.
By far the best tutorial on how to setup Laravel 5.3 + Ubuntu 16 + Nginx + PHP 7
Very very thanks for this!! I’v been searching around internet for something like this. What would you recommend for non-server guy to reach the same goal in a shorter time?
Pay $15 a month for Laravel Forge. It automates everything here so you can just click “start” and it creates everything automatically.
Excellent tutorial, thanks. Any idea why my install requires a password? I thought the ssh key would take care of that?
Everytime you run `sudo` you are telling it to run as super user which requires a password for your server’s safety. Sudo is so dangerous that it requires further authentication beyond just your SSH key.
I have follow the guide to deploy my laravel app. But I am getting a 502 error when it was suposed to have a 402. I notice that it occurs when I change the server route.
What can it be?
You will have to check your logs. Generally a 502 is because you are getting a server side error for some reason (could be anything but your logs will be what tells you the error). A 404 on the other hand (or a 402) is because a page doesn’t exist. So the 502 means you have a server side error, check your logs to see what it is.
The first few lines of the error actually is:
[2017-03-18 03:26:46] production.ERROR: RuntimeException: No supported crypter found. The cipher and / or key length are invalid. in /var/www/laravel/bootstrap/cache/compiled.php:7717
This is probably because you do not have an encryption key set yet. Run `php artisan key:generate` and this should generate a key and then try what you were doing again and I think it will work.
I would like to thank you for some very insightful content! These tutorials that bridge the gaps between beginner and a well rounded advanced user is just what i needed.
Please let us know what we can do in order to keep you going, I know that there are a lot of areas that still need to be mapped and i just hope that you don’t shy away from such a daunting task and make creating new content part of your weekly routine.
If you ever need any help to lighten the load, please let me know and i will be more than glad help out.
Hi I ran into an issue executing “composer install –no-dev” see below error massage. I updated my php.ini mem flag to 1G but still same issue.
> Illuminate\Foundation\ComposerScripts::postInstall
> php artisan optimize
PHP Fatal error: Allowed memory size of 1073741824 bytes exhausted (tried to allocate 262144 bytes) in /var/www/html/website/vendor/laravel/framework/src/Illuminate/Container/Container.php on line 549
Just wanted to say thanks for the great tutorial! I tried a few different ones, but this got everything running smoothly. Keep up the great work!
Glad to hear it finally works. I will keep it up to date so you can check back regularly when you do another deployment.
Hey, thanks for this, its awesome, and i love and learn a lot from your other tutorials too, keep up the great work 🙂
Just wondering though, about the LAMP part (insted of LEMP) version ? is it coming or is on ice ?
Cheers,
Very popularly requested. Will get the LAMP stack up soon.
Alex, great guide. I don’t know if other has pointed this out. For Laravel 5.4 you need to install php-xml. Otherwise, you will get error Class Domdocument not found when sending email.
Hope it helps others running into the same problem
This should only be required for PHPUnit. As long as you run `composer install –no-dev` instead of just `composer install` then you should be ok. I believe it is the PHPUnit package requiring the DOM extensions (which is what php-xml installs) and you don’t want PHPUnit in production. So make sure you are running `composer install –no-dev` with that `–no-dev` flag at the end.
Thanks for this one ! I checked a tons website and find you. It works. Anh, how can I connect database with navicat or view database?
should #!/bin/sh
be
#!/bin/bash
typo? was just following with the youtube vid…
Depends if you are using BASH or SH as your shell. Either should work. Most distros have both
I spent several hours trying to set up my first server to no success.
Following your guide, it was simple and straight forward.
Everything worked as expected.
My sincerely Love to you for putting up a guide so detailed as this.
Thank you very much.
Thank you, great tutorial.
Can I deploy multiple apps on a single droplet? And can these apps be built in different web technologies. For example: Can I have laravel and nodejs apps on one droplet? How difficult is it to configure?
Thank you so much. Its my first time to develop a web system as a school project and my first time pay for a hosting service and was looking on how to deploy my app. Your tutorial is extremely helpful for someone like me. More power to you man!
Thanks so much Curtis, this tutorial series was very useful for me.
Thanks for the lesson. Helped me a lot!
Hi, when I want to test the git push command to the production. It shows this error, what cause that happen?
remote: /bin/bash: git –work-tree=/var/www/laravel –git-dir=/var/repo/site.git checkout -f: No such file or directory
Did you ever find a solution? Same issue here, Thanks
I have my project up and running on using laravel homestead with vagrant and virtualbox on my local machine, I deployed to my LEMP stack as shown above, but I noticed some of my links not working.
It enters a continuous loop trying to load page but fails with a time out error trouble shooting is taking two months now with no headway .
I need some assistance from anyone to point me in the right direction am getting worked up now.
Pingback: DigitalOcean - One Click Apps or Distribution image for Laravel? - Laravel Questions
I have an error when I try to execute this command git push production master
Error is “remote: fatal: This operation must be run in a work tree”
What I have to do with this problem?
Ok, I resolve this problem.
In Step 8 this block must include “include fastcgi_params;” for parameter passing with url
location ~ \.php$ {
include snippets/fastcgi-php.conf;
fastcgi_pass unix:/run/php/php7.0-fpm.sock;
}
Man, this guide’s never failed me, I’m saving it as a treasure. Thank you so much!
I just found out that the composer binary is the only one who sits in /usr/local/bin folder when other binaries sit in /usr/bin folder.
Can I move it into the other folder too?
Hi Jacurtis,
Nice tutorial. But I have problem , I have two application one is Front end and other one is backend how can I host both the application on nginx. Thanks in Advance.
Yes you just need to configure another server block in Nginx for the second app. You can run as many apps on the same server as you wish with Nginx.
Firstly, thanks for this awesome guide. I’ve followed the guide and works fine until i got stuck on step 15.. where i need to set laravel privilege..i don’t get “whoops” laravel error message and i don’t get any error log in my laravel.log. Hope you could help me solve this issue.. Thanks in advance.
Yo Alex, you got showing in code view instead of turning the color red like you intended 🙂
Your tutorials are the best sir, even your text tutorials are awesome!
Thanks so much
Dear @jacurtis,
I am getting this error every time. How can I fix it?
fatal: ‘/repo/site.git’ does not appear to be a git repository
fatal: Could not read from remote repository.
Please make sure you have the correct access rights
and the repository exists.
Hi, the code isn’t displaying properly, can you fix it?
I always come to your blog to follow this post when I deploy a new app, and these html tags between the code confuses me a lot.
Here’s a screenshot of the problem:
http://i.imgur.com/iDSBx3S.png
Hi, I’m just commenting to let you know that the code blocks aren’t displaying properly on Chrome and Safari for Mac, it’s mixing some HTML tags between the codes, it confuses a lot. Can you fix it?
Here’s a screenshot of the problem:
http://i.imgur.com/iDSBx3S.png
Thanks.
Most complete tutorial I’ve found on the subject. I’m getting a 502 error, though. My log says
2017/06/15 04:58:33 [error] 16507#16507: *60 connect() failed (111: Connection refused) while connecting to upstream, client: 191.35.28.93, server: 104.131.13.134, request: “GET / HTTP/1.1”, upstream: “fastcgi://127.0.0.1:9000”, host: “104.131.13.134”
2017/06/15 05:02:28 [notice] 16528#16528: signal process started
Any ideas?
Best tutorial ever
thanks so so much
You are a brilliant person… Thanks so much for this guide!
Huge thanks!
Efficient tutorial. But a small addition to the Swap file section can make it more complete as I was facing the issue that the Swap file was being lost with the Server reboot.
We are creating the Swap file but not persisting it permanently. To make the Swap file permanent, we can add the swap file to our /etc/fstab file.
First backup the current /etc/fstab file by: sudo cp /etc/fstab /etc/fstab.bak
Then, add the swapfile information to /etc/fstab by typing: echo ‘/swapfile none swap sw 0 0’ | sudo tee -a /etc/fstab
Thanks again for this fantastic and helpful tutorial.
Just wondering I run composer update on my local, then there is a changes in composer.lock, if I push it on my server does will affect anything? Or other question, how to update my laravel, just by typing composer update?
Thank you for your splendid explanation on how to setup the laravel project on vultr, I have already run my forum on my server. But I have encountered with another problem, the email function of the laravel work on my local virtual machine but it seems not work on the VPS. Can you introduce more on how to setup the mail on the vultr
P.S. server system: Ubuntu 16.04
This ultimate guide has helped me through my first and second deployment of my laravel projects. Thank you
perfect tutorial.it helped me
I’ve managed to deploy my page, migrate the database and seed it.
The only issue I have is with the subpages which give me a 404 even though they exist in the controller.
https://turtles.devel.kazuto.de/register
NGINX config: https://pastebin.com/GxeryhNM
git init –bare is a life saver man!
thanks
Wow, awesome guide alex. Thank you so much!
Wow great job! Thanks! Lots to learn…
Great tutorial! I deployed my Laravel Project, but the links for my images are broken.
Anyone got the same problem?
thks community!
Thanks. Helpful, but facing one issue.
[2017-08-29 13:57:09] production.ERROR: Symfony\Component\Debug\Exception\FatalThrowableError: Call to undefined method Closure::__set_state() in /home/satishgarhwal/public_html/backend/bootstrap/cache/config.php:193
Stack trace:
#0 /home/satishgarhwal/public_html/backend/vendor/laravel/framework/src/Illuminate/Foundation/Bootstrap/LoadConfiguration.php(28): require()
#1 /home/satishgarhwal/public_html/backend/vendor/laravel/framework/src/Illuminate/Foundation/Application.php(208): Illuminate\Foundation\Bootstrap\LoadConfiguration->bootstrap(Object(Illuminate\Foundation\Application))
#2 /home/satishgarhwal/public_html/backend/vendor/laravel/framework/src/Illuminate/Foundation/Console/Kernel.php(267): Illuminate\Foundation\Application->bootstrapWith(Array)
#3 /home/satishgarhwal/public_html/backend/vendor/laravel/framework/src/Illuminate/Foundation/Console/Kernel.php(114): Illuminate\Foundation\Console\Kernel->bootstrap()
#4 /home/satishgarhwal/public_html/backend/artisan(35): Illuminate\Foundation\Console\Kernel->handle(Object(Symfony\Component\Console\Input\ArgvInput), Object(Symfony\Component\Console\Output\ConsoleOutput))
#5 {main}
Thanks a lot, it really helped me a lot
cloud you please fix the style of examples in the post
5
6
7
8
9
10
11
12
13
14
15
16
17
<?php
return [
‘env’ => env(‘APP_ENV’, ‘production’),
‘debug’ => env(‘APP_DEBUG’, false),
‘url’ => ‘http://example.com‘,
‘timezone’ => ‘America/Denver‘,
‘locale’ => ‘en‘,
‘fallback_locale’ => ‘en‘,
[CONTINUES BELOW]
]
Thank you
Alex Thanks a lot for taking the time to make this guide, it helped me a lot, Thanks again.
Thank you for this great tutorial. I am having issue when pushing to the server. I receive this error anytime I run “git push production master”. Any idea?
Permission denied (publickey).
fatal: Could not read from remote repository.
Please make sure you have the correct access rights
and the repository exists.
did you figure this out?
I am stuck on pushing to production
That’s quite a long process just for install Laravel. Isn’t tools, like Cloudways, a better option for hosting Laravel, since this platform gives you pre-configured LEMP stack with pre-install Laravel. This would save a lot of time.
Yes these are great solutions. Often times people are looking for ways to install Laravel without using additional services on top of their hosting, which is what I provided here. But I do in fact use these types of services myself for many projects, so they are great too.
Ahh yeah that is what I thought too, but knowing your own way of setting things up is pretty usefull too. (I think?)
prefix path with “../” when pushing to production server
nice tutorial…
please fix this: https://cdn.pbrd.co/images/GLlLiA9.png it’s just showing html!
Thanks JACurtis
As above, I followed your excellent guide but I don’t get the ‘Whoops’ message?
I’m using laravel 5.4
Pingback: Configuring Laravel on our Server for Deploying a Laravel 5 App - Laravel & VueJs
Hi Curtis, thank you very much for this tutorial,
When you creating a server there is an option to insert your script file, How can I create such file to install all the scripts for this tutorial? specially when it asks you to insert (Y or N) in MYSQL server configuration
I am not sure what the scripts are that you are referring to. Is this a MySQL thing? I would have to go back and look because I am not sure about that prompt or what scripts it is referring to.
Hi can you do a tutorial or point me to tutorial on how to set up a server and host a custom domain using free dns servers. i have a server and a domain and i want to serve that domain from my server . or give me a simple guide on the same
All the services i recommend here also provide free DNS. Just get your domain, point it to the DNS for digital ocean or Vultr and then they will handle DNS from there. ILl try to get a video up about it.
I am facing problem when pushing to server. Below is the error. I do have access and rights to repo but still facing the problem. Please help me fix this. My project deadline is near and running out of time.
$ git push production master
fatal: ‘/repo/site.git’ does not appear to be a git repository
fatal: Could not read from remote repository.
Please make sure you have the correct access rights
and the repository exists.
When I setup local computer on windows to push to production I get an error: “sh_exchange_identification: Connection closed by remote host
fatal: Could not read from remote repository.”
What should I do?
That felt like going back to school again and learn what really matters!
Excellent tutorial, to the point!
Keep up the great work!!
Love it
Great work. This has helped me tremendously.
On my system I am viewing this page with Chrome and all of your example code is show the HTML tags rather than rendering them. Is there a way to fix this?
Thanks.
in case someone is using this great tutorial for Amazon AWS EC2 servers.
When “git push production master” I got “fatal: Unable to create temporary file ……. ./objects/pack/tmp_pack_XXXXXX’: Permission denied ‘
I spent half day fixing it. It two words, when you created the /var/repo/site.git and /var/www/laravel you did it with a user “root” (via sudo), when ‘git push’-ing you are using user named ‘ubuntu’ (that’s username Amazon AWS gives you to access it’s ubuntu servers), so you need to (when you are logged in the server, of course):
sudo chown -R ubuntu /var/repo/site.git
sudo chown -R ubuntu /var/www/laravel
(of course if you use other names instead of ‘laravel’ or ‘site.git’ – change them).
Dude thank you so much. That really solves my problem.
Hi, This is great. Thank you for the help.
How can I import my database to MySQL?
great tutor
Hi,
Awesome tutorial – the best I found. Please keep up the great work!
This is awesome! I’m wondering how to deploy to server directly from github or gitlab? That is, I push code from my machine to github / gitlab first; and then pull that code from the server?
hello sir i really love your tutorials because it is well explained…i learned a from it ,…hope you will do a tutorial on how to make a elearning using laravel
I open this tutorial at least a dozen times every week. Very helpful article and awesome videos on youtube.
Thanks.
Lovely, Made my life so easy I cannot tell you. Love you Alex.
Hello, thanks for the tutorial. Please post one for Laravel 5.6. Am having challenges.
Yes I am posting an update for Laravel 5.6 soon
Nice tutorial. Setting up a server is one thing. But maintaining it in the long run and optimizing it for a better performance is a whole different story. For that, I like the idea of Managed hosting providers like Forge and Cloudways. These providers make life easy to setup up and deploy Laravel application on the cloud infrastructure of your choice including Linode, DigitalOcean, and Vultr. You get an optimized stack and many other features as well.
Yes this is true. In fact I use these providers for my productions applications as well. But this guide can be helpful for people setting up a server for the first time. THere is a lot to learn and it can give them a sense of how it all comes together. I also believe that it is good to learn this stuff first so you understand what managed providers are doing to your server. Plus inevitably you are going to need to step in at some point anyway and its good to know the basics of setting up your server.
For laravel 5.6 use php 7.1.3
https://www.vultr.com/docs/how-to-install-and-configure-php-70-or-php-71-on-ubuntu-16-04
Yes this needs to be updated
What can I do to troubleshoot an empty /var/www/laravel folder after initial git push?
Terminal showed a successful push however my laravel folder is empty and therefor I cannot move forward.
Hello first off thank you so much for this tutorial as it has been a great help.
However what can I do to troubleshoot and empty /var/www/laravel folder after my initial git push to remote production?
Terminal showed that all files were uploaded successfully but my laravel folder is empty.
Check the git folder that we created. Your project is probably sitting in their. You likely have an issue with the bare git install, and it needs to be configured correctly to point to your laravel folder.
Quick question – is the $20 credit still available on Vultr? I am asking, since this article is 18 months ago, there is no mention of the offer being time-limited but wanted to ask first.
Thanks.
I think it is over now. Unfortunately, I couldn’t get Vultr to extend it. I am trying to find another VPS provider to team with to offer you guys a deal in the future.
Excelente, estimado amigo gracias por tu gran trabajo.
Hi,
Have You done any video in how to get Phpmyadmin on this config too?
if no, will you?
thanks
It’s really a great post. Thank You.
Just wanted to add that I deployed my first project according to these instructions.
Alex, thank you very much that you spend probably so much time to write them.
Thank you!!!
Thanks, dude! Your tuturial very help me (different posts of different teachers probably wrong..). Big thanks from Russia!
P.S. “12 step” in tutorial are using twice..)
Thanks for the feedback, ill change that.
Alex, great work you’re doing here. Pls I wanted to find out if you have git installed on windows, do you still need putty to be able to ssh into the server cos I followed your git tutorials and I realised that gitbash on windows has ssh in it
Yes you can ssh into your server with gitbash. I think the only difference is that it you need to specify the port (which is 22 by default on most servers).
Heres some information on it: https://stackoverflow.com/a/22040467/2781542
This is the most complete guide i’d ever seen, thank you so much alex!
Glad you found it helpful. Thanks for taking time to read it.
Hey Alex. Thanks for all the effort you put in to give us the knowlede to build web applications on our own. I study software engineering, I built something, probably as big as your web site from what I learned in YouTube. Now it’s time fo publish it, but I will need some more help. As you might guess I can’t pay a lot for email service and server separately. What would be your best recommendation?
An outstanding share! I have just forwarded this onto a coworker who has been doing a little
homework on this. And he actually bought me lunch because I stumbled upon it
for him… lol. So let me reword this…. Thank YOU for the meal!!
But yeah, thanks for spending some time to discuss this subject here on your web site.
Haha, i love it! Glad this was helpful.
Hi Alex,
1. Must I run composer install or compsoer install –no-dev after something is changed in composer.json?
2. Can I automate this process “composer install” with git ? If Dev Team is big, it is very exhausting to check, if any member in Team did some changes in composer.json and then check Server. Can we not do some script, that checks e.g. in post-receive if composer.json is changed and when yes, run “composer install” and the same thing on local?
best regards
Davit
Thanks Davit, these are good questions.
1) You need to run `composer install –no-dev` as opposed to `composer install` because you have no need for dev dependencies. I have no researched if there is a way to change the “default”. But its just something that i have gotten used to remembering to do.
2) As far as automation, you can run scripts to automatically run `composer install` through most CI environments. I do not think this is something you can do in Git natively however. But you can always customize a linux box to do anything, so I am sure someone out there has written a package that would accomplish this. Personally I would look at a CI solution which can run these types of scripts after each update from your repository. I do know that Laravel Forge allows you to run scripts after each update and it automates the `composer install –no-dev` just like you are looking to do. I have also used AWS Elastic Beanstalk which also allows you to do this and much more. If you are working on a large team I would highly recommend something like Elastic Beanstalk for a multitude of reasons, but namely to remove the possibility for human error that comes from a large distributed team.
Hi Alex,
1. Must I run composer install or compsoer install –no-dev after something is changed in composer.json?
2. Can I automate this process “composer install” with git ? If Dev Team is big, it is very exhausting to check, if any member in Team did some changes in composer.json and then check Server. Can we not do some script, that checks e.g. in post-receive if composer.json is changed and when yes, run “composer install” and the same thing on local?
best regards
Davit
Hey Davit.
Most people configure their servers with scripts to automate the process of pulling from git and setting up their servers. In the case of `composer install` most people just have this in the script to run after every `git pull` that you do. Composer is smart and will recognize that a `composer.json` file has not had any changes and will not do anything. It might also run updates on packages that are within your versioning limits defined in `composer.json`. So basically get used to always running `composer install`. If there are no changes then nothing will happen. So it doesn’t do any harm to run it.
Hi Alex
thank you for the nice guide it helps a lot
Do you have a video/guide abaout configuring the LAMP stack, where is it ?
What about npm modules. I think i have to run npm install .And then instead of run npm run dev something like npm run prod ? How do i create the dependencies for production for npm modules ?
hey
first of all thanks for this great tutorial!
that was really well-explained
here is some of my mistakes while learning it, hope helps someone:
1.be careful while you are copy and pasting! I paste this line without changing the php version and i caused a problem in site loading:
fastcgi_pass unix:/run/php/php7.0-fpm.sock;
2.when you cache your config files:
php artisan config:cache
next. env file changes doesn’t work immediately (or never) and you should clear the cache by:
php artisan config:clear
i saw Ultimate Guide: Deploy Laravel 5.3 App on LEMP Stack (Ubuntu 16 and Nginx).its very helpful easy to understand.but for a long time i am eagerly waiting for LAMP stack .Please make the tutorial quickly.There is no a single clear tutorial of LAMP stack like yours.
thankz bro . 🙂
i saw Ultimate Guide: Deploy Laravel 5.3 App on LEMP Stack (Ubuntu 16 and Nginx).its very helpful easy to understand.but for a long time i am eagerly waiting for LAMP stack .Please make the tutorial quickly.There is no a single clear tutorial of LAMP stack like yours.
thankz bro . 🙂
Hi Alex,
thanks for this amazing tutorial. I used it to build my webserver and everything worked fine.
But now I tried to build another server and I can’t geht it working.
When I push to the repository, the hook fires, but after that no files are in the destination-folder 🙁
The pushed branch shows up in the “refs” folder of the repository.
While pushing there are no errors shown.
Do you have any idea? – I’ve done your tutorial several times, but I can’t get it working.
Thx and again: fantastic tutorial!
Christian