So you found a cool Laravel project off Github.com and want to use it locally to play around with it, or learn from it. Or maybe you are following another DevMarketer project and are having trouble getting started from one of the github repos.
This tutorial will show you the standard things you need to do to clone a github repo onto your local computer and get it setup to start working on your system.
In addition to cloning the repo, this means we need to setup the database, the env file, the encryption key, and more.
So grab your favorite repo and let’s clone it and get it working on your local system.
1. Clone GitHub repo for this project locally
If the project is hosted on github, we can use git on your local computer to clone it from github onto your local computer.
Note: Make sure you have git installed locally on your computer first.
Find a location on your computer where you want to store the project. In my case I like all my projects to be a folder called sites/, so that is where I run the following command, which will pull the project from github and create a copy of it on my local computer at the sites directory inside another folder called “projectName”. You can change the name of this folder it creates, by changing the last part of the code snippet below to match the name you want your folder to be called.
git clone linktogithubrepo.com/ projectName
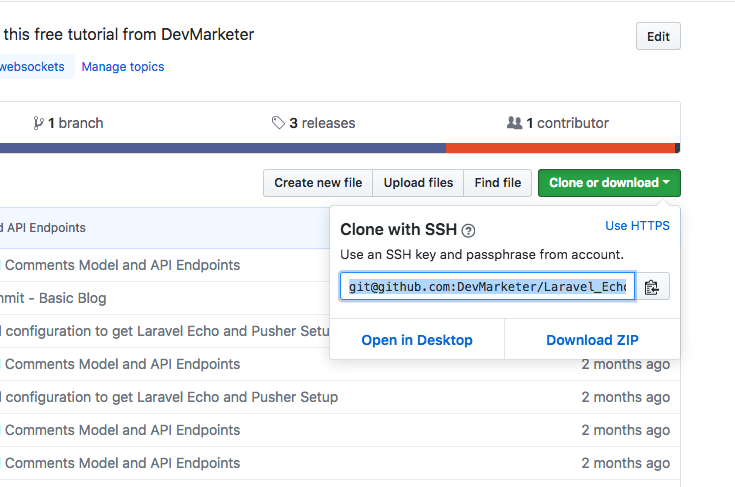
To get the link to the repo, just visit the github page and click on the green “clone or download” button on the right hand side. This will reveal a url that you will replace in the linktogithub.com part of the snippet above.
Once this runs, you will have a copy of the project on your computer.
2. cd into your project
You will need to be inside that project file to enter all of the rest of the commands in this tutorial. So remember to type cd projectName to move your terminal working location to the project file we just barely created. (Of course substitute “projectName” in the command above, with the name of the folder you created in the previous step).
3. [Optional]: Checkout the “Start” tag so you have a fresh install of the project (and not the final files)
By default you have cloned the entire git repo, which will include the final project. If you are following another tutorial from DevMarketer, then I usually create a tag with git, that marks the beginning of the project so you can follow along with the tutorials on this site and my YouTube channel.
Keep in mind that this step is optional because not all git repos will have a start tag, but most the tutorials that I create for you will have a start tag. Otherwise you can skip this step.
Of course you want to start at the beginning so you can learn how to do that all on your own. So we need to use another git technique called “checkout” to checkout the beginning of the project so you have the same starting code that I have in the video, allowing you to follow along with me in the upcoming videos.
We will use the following code snippet to “checkout” the start point which I marked with a “tag”. These are all git terms that you will become familiar with as you use git more and more.
git checkout tags/start -b tutorial
You can change the last word (“tutorial” in this example) to be the name of the working branch you prefer. This is going to checkout the start tag and put it on a fresh new branch with the name you provide here. This allows you to work without ruining the final code in your project (you can always move over to the master branch for the final code that I submitted).
If you don’t understand anything about git or branches than just use the code snippet exactly as it reads here and it will work just fine.
4. Install Composer Dependencies
Whenever you clone a new Laravel project you must now install all of the project dependencies. This is what actually installs Laravel itself, among other necessary packages to get started.
When we run composer, it checks the composer.json file which is submitted to the github repo and lists all of the composer (PHP) packages that your repo requires. Because these packages are constantly changing, the source code is generally not submitted to github, but instead we let composer handle these updates. So to install all this source code we run composer with the following command.
composer install
5. Install NPM Dependencies
Just like how we must install composer packages to move forward, we must also install necessary NPM packages to move forward. This will install Vue.js, Bootstrap.css, Lodash, and Laravel Mix.
This is just like step 4, where we installed the composer PHP packages, but this is installing the Javascript (or Node) packages required. The list of packages that a repo requires is listed in the packages.json file which is submitted to the github repo. Just like in step 4, we do not commit the source code for these packages to version control (github) and instead we let NPM handle it.
npm install
or if you prefer yarn (as i do)
yarn
6. Create a copy of your .env file
.env files are not generally committed to source control for security reasons. But there is a .env.example which is a template of the .env file that the project expects us to have. So we will make a copy of the .env.example file and create a .env file that we can start to fill out to do things like database configuration in the next few steps.
cp .env.example .env
This will create a copy of the .env.example file in your project and name the copy simply .env.
7. Generate an app encryption key
Laravel requires you to have an app encryption key which is generally randomly generated and stored in your .env file. The app will use this encryption key to encode various elements of your application from cookies to password hashes and more.
Laravel’s command line tools thankfully make it super easy to generate this. In the terminal we can run this command to generate that key. (Make sure that you have already installed Laravel via composer and created an .env file before doing this, of which we have done both).
php artisan key:generate
If you check the .env file again, you will see that it now has a long random string of characters in the APP_KEY field. We now have a valid app encryption key.
8. Create an empty database for our application
Create an empty database for your project using the database tools you prefer (My favorite is SequelPro for mac). In our example we created a database called “test”. Just create an empty database here, the exact steps will depend on your system setup.
9. In the .env file, add database information to allow Laravel to connect to the database
We will want to allow Laravel to connect to the database that you just created in the previous step. To do this, we must add the connection credentials in the .env file and Laravel will handle the connection from there.
In the .env file fill in the DB_HOST, DB_PORT, DB_DATABASE, DB_USERNAME, and DB_PASSWORD options to match the credentials of the database you just created. This will allow us to run migrations and seed the database in the next step.
10. Migrate the database
Once your credentials are in the .env file, now you can migrate your database.
php artisan migrate
It’s not a bad idea to check your database to make sure everything migrated the way you expected.
11. [Optional]: Seed the database
If your repository has a seeding file setup, then now is the time to run the seed, which fills your database with starter or dummy data. If the repo doesn’t mention the existence of a seeder file, then skip this step.
After the migrations are complete and you have the database structure required, then you can seed the database (which means add dummy data to it).
php artisan db:seed
Many of the repos I create for tutorials here on DevMarketer will create 25 randomly generated users and 100 randomly generated blog posts in your database. If you want to log in as a user, grab an email address from the database and use “secret” as the password to log in as that user. That is the default password I generally use.
All of this information is usually contained within the GitHub readme file, so be sure to check it when starting a new project from a Github repo.
Wrapping Up
That is all you need to get started on a project. Of course some projects will have specific steps that only apply to that project, and be sure to read the readme.md file on Github before you start customizing a project. This will often contain specific steps that are unique to that project, but the steps I have outlined above are the necessary steps you will need to follow to gt any standard Laravel project up and running from a github clone.
Hopefully this has helped you get up and running with your next project. Be sure to follow us here on DevMarketer.io or on the DevMarketer YouTube channel for more great tutorials to learn to master Laravel, Node.js, and other popular web technologies and marketing techniques.

Thank you I always forget these steps while cloning a repo
Deploying laravel project from github to a server is quite easy if you are using Cloudways to host Laravel project. With this platform you only have to connect your server with github repo and deploy in single click.
i love these steps really helped me.
Thank you.