Today’s quick tutorial comes inspired by many wonderful followers who watch my videos and ask me: “Why don’t you have to type a username and password into your terminal when you git push ?”
So if you are tired of typing your username and password in just to make a simple push to GitHub, then today is your lucky day. The madness ends today. We are going to make the task effortless, by generating an SSH key and setting it up in GitHub.
Setting up SSH Authentication
This process of not needing to use a username and password is called SSH authentication. Basically you are going to generate a long random string of characters and symbols and instead of submitting a username and password, your computer will submit this long string. GitHub will compare the string with the one I told it belongs to my computer and if there is a match, then GitHub lets us through. Of course it is more complex than this behind the scenes, but this is good enough to understand it for now.
The basic process of getting this set up is as follows:
- Generate the SSH Key on your Computer
- Add the SSH Key to the SSH Agent
- Save the SSH public key to your GitHub Account.
Part 1: Generate an SSH Key
Before we do anything, we need an SSH key to work with. We generate the key through the terminal or git bash. The following commands work on Windows, Linux, and Mac exactly the same. The only difference between the three operating systems is that Linux and Mac will use the terminal and Windows will use their Git Bash program.
ssh-keygen -t rsa -b 4096 -C "[email protected]"
You will be asked for a location to store the key and you will want to just click enter to save it in the default location.
Next it will ask you for a passphrase. This is optional but recommended. Type in your password now and click enter. It will ask you to confirm and obviously just do it again.
Part 2: Add Your SSH Key to your SSH Agent
Next we need to let our computer’s SSH agent (the program that distributes and uses the SSH keys) to know which SSH key to use. You probably only have one SSH key on your computer, so this won’t be very hard, but you could theoretically have an infinite number of them. This is why we tell the SSH agent which one to use.
Of course first we need to enable the SSH agent:
eval "$(ssh-agent -s)"
Now you should have it enabled and you can now set it to use the key we just generated:
ssh-add ~/.ssh/id_rsa
Now our SSH Agent, knows which key to use, so it is time to tell GitHub all about our adventures.
Part 3: Add the SSH Key to GitHub
All that is really needed at this point is to copy the ssh key and paste it into GitHub. The problem is that copying the code isn’t the easiest thing in the world. We need to use the terminal again. The problem is that this will vary depending on which OS you use.
MacOS:
pbcopy < ~/.ssh/id_rsa.pub
Windows:
clip < ~/.ssh/id_rsa.pub
Linux:
You unfortunately don’t have a copy feature built into all distributions of Linux, so if you don’t have one already we will install xClip.
sudo apt-get install xclip
Now that you have it, you can copy it to your clipboard:
xclip -sel clip < ~/.ssh/id_rsa.pub
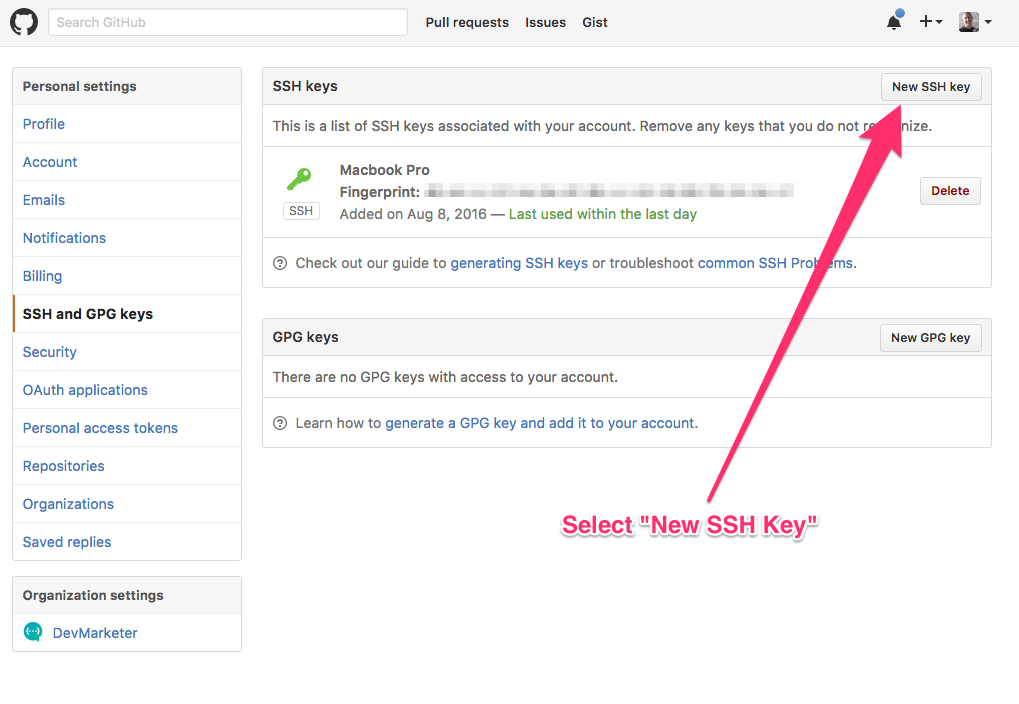
Now you will have your SSH key in your clipboard of your computer. You can simply paste it into GitHub. Log into GitHub and go to the settings page. You can access the settings page by clicking on your avatar in the top right and going to the bottom of the menu and choosing “Settings”
Now select SSH and GPG on the left hand side.

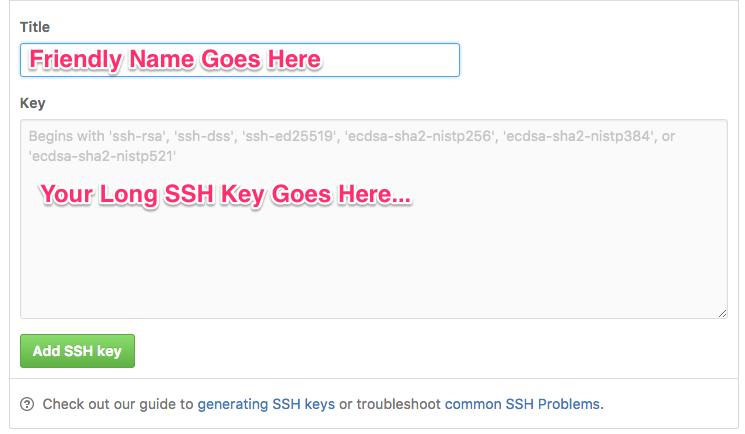
Select “Add New SSH” and paste your code into the large text field.

That is literally all there is! You just need to save the key and then start using git like you normally would inside the terminal.
Few Last Things
You will notice the first time you go to use the command that it will ask if you want to add github to a list of known hosts. You will want to type yes to these requests because it will remember that GitHub is safe and then not harass you about pushing to it anymore. After the first time you select that option, you shouldn’t have to do it again.

Your tutorials are so helpful! Thank you so much!