Looking for the code? Click Here to Scroll Down.
You might remember back to the beginning of the “How to Build a Blog with Laravel 5” series I did a while back when we launched our page for the first time. I went on a rant live on camera about how much I hate the new Laravel 5 error pages. I got many comments about how passionate my hatred was, but I still stand by my reactions.
To recap, in Laravel 4 we had these beautiful error pages that displayed when something went wrong with our application. They not only looked better, but they actually provided more data to help you debug. The new error pages are almost useless and the generic error responses are less than helpful.
Bringing Back the Beautiful Error Pages
Well luckily time has been good to us, and we have a way to bring back those error pages that you have been losing so much sleep over. Originally in Laravel 4, they actually used a php package called Whoops. This package was bundled with Laravel as the default error handler. I am still not sure why it was taken out, but maybe someone can comment below and shed some light on it for me.
Along came Laravel 5 and the Whoops package was no longer pre-bundled with new projects. We could obviously cry about it, or we could just do something! Let’s show you how to bring back those awesome error pages.
Install Filp/Whoops
You can find the details for this package on Packagyst, but it isn’t 100% necessary since I am about to make it really easy for you.
First add the package to your project via composer. Make sure that you are in your Laravel project when you do this and then type the following command:
$ composer require filp/whoops
Once you click enter, then it will quickly add that package to your composer.json file and then run composer update automatically.
You might notice that if you try to visit another webpage you actually get the old error message still. What gives?

Well, we still need to do some tricky coding and thats the real reason I made this post. We now need to tell Laravel that when it experiences an exception (an error) to post this page and display the data instead of throwing a normal error page.
To do what we need, we will venture into a scary folder that sites inside the app folder. We all try to avoid it, i know, but we have no choice. Open up that exceptions folder. Inside the exceptions folder should be a file named handler.php. Inside the handler.php file we need to add this block of code at the bottom (before the last curly brace).
Once we paste this into our file, you can go ahead and save the file. Now to test everything, launch your Laravel server of choice and go to a URL that doesn’t exist. This should throw an error and give us our first fancy Whoops error page.
Features of Whoops Error Pages
Now that you have a fancy Whoops error page, what can you do with it? Well you could obviously admire how beautiful it is. You wouldn’t be the first person to admire a web page. However it has more then a fresh coat of paint.
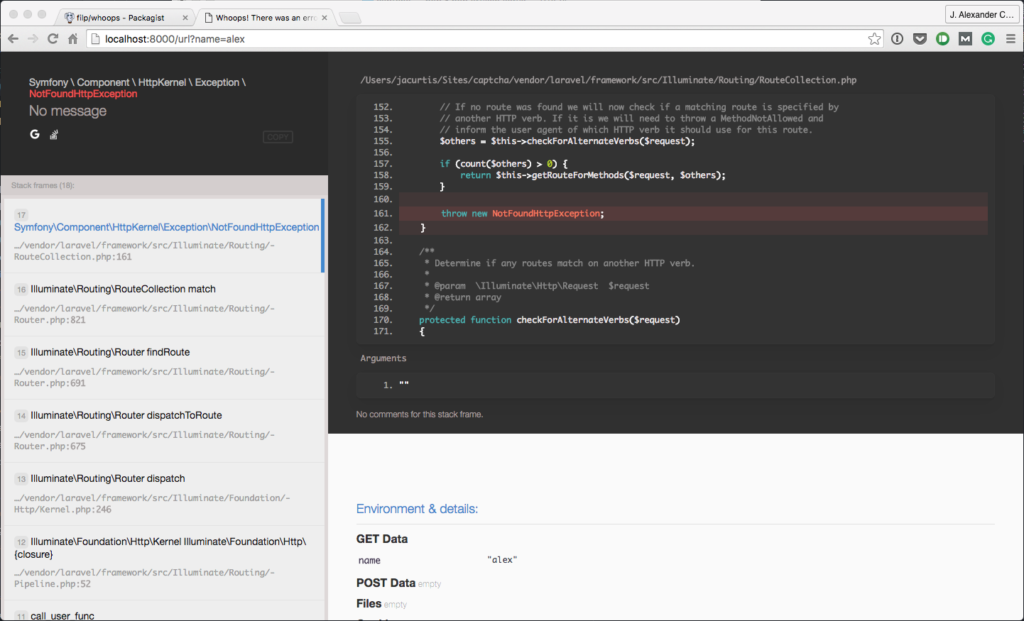
When you first get your error, the actual message will display in the top left. Below this section you will see the stack trace, which shows the files that were used leading up to your error. Unlike the basic Laravel 5 error pages, this stack trace is interactive. Try to click the various files and you will see them update in the code view to the right.
The stack trace is designed with the most recently used files at the top of the stack and the original files at the bottom of the stack (sometimes you need to scroll). Usually it is best to start at the top of the stack and then scroll down and find a file in the stack that looks familiar, or one that you worked with recently. Click that file, and you will see the code displayed to the top right.
Your full file URL is at the top, above the code view and the code displayed beneath it. This code view has a center red line, which is the line where the error either occured (or PHP thinks it occured at least) and a few light red lines above and below this. The reason that these are highlighted is to show you where in the file, the error is suspected to have occured. If the page you are looking at is not at the top of the stack, then the highlighted area is the area where the file passed onto another file. You will find 10 lines of code before the error and 10 lines after the error also displayed.
Underneath the code view (but still in the black area is the arguments section. If the code called another file and passed parameters over to another file, then you will see what data it passed in this small section.
Moving now into the white area is our Enviroment and Details section. This section shows all the information you might need for debugging. The most useful stuff at the top is the GET or POST data (if applicable), the files in the header, the session variables, and cookies. This information might be useful in helping you determine why an error occured.
Further down this section you will find the Server and Request Data which shows you where the last request came from, including the machine, URL, and server information. Below this section is the Enviroment Variables area which is sometimes useful, but not usually. It basically displays everything in your configs, which might reveal an issue if you let an API key blank or forgot to update something.
My Favorite Feature
Of course I would be sad to leave you without my most favorite feature, which is the fact that by the error message in the top left of the screen, you have all sorts of buttons to interact with the message.
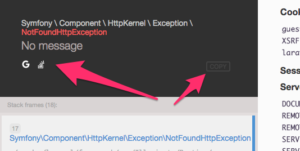
First of all, you could click the copy button to copy the error to your clipboard. There are many reasons you would want to copy the message to your clipboard, but the biggest reason would be to search the error on Stack Overflow or Google. Well friends, I have even better news because searching theses sites is even easier thanks to dedicated Google and Stack Overflow buttons below the error message. These buttons, when clicked, will open the applicable site with the error message already in the search field.
This feature makes searching for an error effortless. One click and you can see a long list of helpful information on how to solve this problem. When you open up Stack Overflow, you may want to add a few keywords to the search to narrow it down a little, but this is easy enough since the long error message is already added.
Pingback: Prettier Error Pages With filp/whoops Package | Developing the web
Hey jacurtis how did you set a bg color and border in $ composer require filp/whoops
There isn’t a way to set the background color. It is just part of the package like that. It is possible the color has changed slightly since I did the tutorial last.
cool error page, thanks for the teaching
Good news! laravel 5.5 comes with the woops error screen!! like laravel 5.4, Great tutorial my friend, i could marry you but sudenly i remember that i’m not gay!
Wow
Adding error pages is great for front-end of Laravel website. But you should also focus on checking the errors in the backend. You can use tools, like Rollbar or Sentry, for Laravel error logging (https://www.cloudways.com/blog/laravel-error-logging-rollbar/ ) and handling. This way you can track errors as they appear and start fixing them